I think I'm going to change my system a bit.
I still have two IBCs (international bulk carriers) and think it's time to make a bigger system. The small amount of water is heating up so quickly that I think I might be in trouble if I get too many days like this in a row.
Today was 40c + and the water reached around 35c. As far as I know that's around the upper limit for my fish. I'll lose a lot of heat over night, but if I get a few days like that in a row I could making my fish miserable or even dead.
The best way to fix this would be a lot more water, and some shade to cover it.
I think I'll start work on a system upgrade.
Showing posts with label Solar hot water. Show all posts
Showing posts with label Solar hot water. Show all posts
Solar hot water - Aquaponics - interesting consistency
I've only put half the measures I have in mind to put, but it seems I'm winning.
I planed on trying a few different things in an attempt to stabilise my grow house temperatures. One was adding thermal mass, another was shifting heat from the top where it was hottest, to the bottom where my thermal mass is, and where it is coolest.
So far I've added around 45L of water as additional thermal mass, and have a coil of black 4mm poly pipe at head height (mine not yours), with water flowing through and into the fish tank, gathering some heat as it does. I also have a 12 volt computer cooling fan blowing some air down from the top.
I turn the fan off at night so it isn't blowing cold air around, and stop the flow of water through the coil of polly pipe, so it doesn't act as a fishtank cooler at night. I'll figure out some what to control both of these automatically at some stage.
This morning was my first real test of the hothouse in the last week, as its the first cold rainy, overcast, and generally wintery day. The last few days have all been sunny even when they have been cold.

The fish tank temperature, and the grow house air temperature were both 17c this morning, and gradually lost heat over the day. It's sundown, and they fish tank and air temp are both 16c.
That's an amazing result as far as I can tell. Even though the world was trying to cool the system, it did quite a good job of hanging on to whatever gains it had saved from past days.
I think this is going to work.
I hope we get a few miserable days in a row so I can see how long it's heat reserves last.
Solar hot water - Aquaponics - Thermal mass
One thing I'd like to do is to stabilise my grow house's climate.
Another is to make it warmer throughout winter.
It seems to be getting warmer, but the fish tank water temperature moves around a lot. So I seem to be making some solar hot water, but I am loosing too much heat overnight. Insulating my grow house is too much like hard work, but...
I have a plan.
Actually I have two plans.
The first is to add thermal mass to the system. I'm going to move more water into the system. Water has the ability to store more heat than stuff like concrete, and a huge amount more heat than stuff like air. This increases the heat storage capacity of my hothouse and should allow me to "bank" some heat. Water is really cheap. Solar heat is even cheaper.
Heat radiates from where ever it is , to wherever it isn't. If I create less places where it isn't, there will be less places for it to radiate to. Creating less places where it isn't also means creating more places where it is.
That should work.
In other words...
If I add some stuff that holds a lot of heat, and add as much of it as I can I should be able to store some of the excess during the day when it is plentiful, and have that release into the system overnight.
Heat likes to share itself around evenly in a very generous manner, so all I have to do is put something in its way that holds a lot of it, and the storage bit should take care of itself. This is the kind of stuff you would learn if you were to study passive solar design, and renovate your house a bit, so lots of people have done lots of work on the subject.
This will mean the fish tank water should heat up more slowly, and cool down more slowly. That sounds like a definition of temperature stability.
There is only a finite amount of heat entering the system each day. This means that if I add a material that absorbs some heat, it must take that heat from somewhere else. What that means is that by storing some heat in my new thermal mass, I effectively cool my grow house a bit from its crazy afternoon temperatures. This means I will not only be storing some heat for the colder times, but I'll also be knocking off the sharp bits of my graph at the top as well, and cooling it a bit during the hottest part of the day. As the day cools down, my thermal mass will reverse it's attitude, and share its excess heat with the now cooler air within the grow house. It should also share its heat with the fish tank, and give my fishy friends a more stable environment.
Everybody wins.
Except the supermarket, and fish monger.
Does a fishmonger "mong" fish?
wiktionary seems to think so. It starts it's definition with "a mixture, a crowd"
So I'm saying yes. I'm defining "mong" as "to gather a stack of things for sale or for general craziness"
Anyway, I plan on doing this in three different ways.
First, I plan on adding water based heat sinks. I can add a stack of them around the base of my grow house where they wont get in the way, and wont take up any growing real estate. I should be able to add an additional 15L or so of water to my grow house. This should increase the total thermal mass of the system and allow it to store more heat.
Second, I plan on running a heat pump in the form of a solar heat conduction coil in the highest part of the grow house where it's hottest, and pump that heat down to the bottom where it's coldest, and where all my water based heat sinks will be.
The third will be for another post because I'm yet to know much about it.
My high tech water based heat sinks will be recycled, plastic, three litre milk bottles full of water.
My high tech solar heat conduction heat pump will be a 10 metre coil of 4mm black poly pipe stuck up high.
That should work.
Another is to make it warmer throughout winter.
It seems to be getting warmer, but the fish tank water temperature moves around a lot. So I seem to be making some solar hot water, but I am loosing too much heat overnight. Insulating my grow house is too much like hard work, but...
 |
| high tech water based heat sinks |
Actually I have two plans.
The first is to add thermal mass to the system. I'm going to move more water into the system. Water has the ability to store more heat than stuff like concrete, and a huge amount more heat than stuff like air. This increases the heat storage capacity of my hothouse and should allow me to "bank" some heat. Water is really cheap. Solar heat is even cheaper.
Heat radiates from where ever it is , to wherever it isn't. If I create less places where it isn't, there will be less places for it to radiate to. Creating less places where it isn't also means creating more places where it is.
That should work.
In other words...
If I add some stuff that holds a lot of heat, and add as much of it as I can I should be able to store some of the excess during the day when it is plentiful, and have that release into the system overnight.
Heat likes to share itself around evenly in a very generous manner, so all I have to do is put something in its way that holds a lot of it, and the storage bit should take care of itself. This is the kind of stuff you would learn if you were to study passive solar design, and renovate your house a bit, so lots of people have done lots of work on the subject.
This will mean the fish tank water should heat up more slowly, and cool down more slowly. That sounds like a definition of temperature stability.
There is only a finite amount of heat entering the system each day. This means that if I add a material that absorbs some heat, it must take that heat from somewhere else. What that means is that by storing some heat in my new thermal mass, I effectively cool my grow house a bit from its crazy afternoon temperatures. This means I will not only be storing some heat for the colder times, but I'll also be knocking off the sharp bits of my graph at the top as well, and cooling it a bit during the hottest part of the day. As the day cools down, my thermal mass will reverse it's attitude, and share its excess heat with the now cooler air within the grow house. It should also share its heat with the fish tank, and give my fishy friends a more stable environment.
Everybody wins.
Except the supermarket, and fish monger.
Does a fishmonger "mong" fish?
wiktionary seems to think so. It starts it's definition with "a mixture, a crowd"
So I'm saying yes. I'm defining "mong" as "to gather a stack of things for sale or for general craziness"
Anyway, I plan on doing this in three different ways.
First, I plan on adding water based heat sinks. I can add a stack of them around the base of my grow house where they wont get in the way, and wont take up any growing real estate. I should be able to add an additional 15L or so of water to my grow house. This should increase the total thermal mass of the system and allow it to store more heat.
Second, I plan on running a heat pump in the form of a solar heat conduction coil in the highest part of the grow house where it's hottest, and pump that heat down to the bottom where it's coldest, and where all my water based heat sinks will be.
The third will be for another post because I'm yet to know much about it.
My high tech water based heat sinks will be recycled, plastic, three litre milk bottles full of water.
My high tech solar heat conduction heat pump will be a 10 metre coil of 4mm black poly pipe stuck up high.
That should work.
Solar hot water - Aquaponics - grow house min max graph
I've been taking some regular notice of the minimum and maximum temperatures of the water in the fish tank since I put it under a grow house.
I made a graph.
I like graphs.
It looks like this....

The red line on top indicates the maximum, the blue line on the bottom, the minimum, and the yellow line in the middle is largely meaningless.
But it does sit in the middle of the other two.
Which is nice.
There is also a thin red trend line and a thin blue trend line which clearly show that my grow house will be hotter than the sun within only a few years, if the trend continues.
I don't think the trend is going to continue.
But it does seem to be stabilising a bit. That could be an illusion due to unseasonable fine weather. It could also be that my concrete has warmed up a bit and is now supplying some heat during the night.
I really have no idea.
I just thought you might like to see my graph.
It will make a bit more sense once I have some more data. After a few weeks, I should be able to make some kind of statement about what it has achieved. I should also be able to do another comparison to the graph I did earlier of a day in the hot house.
I figure, if I pick a similar day, I should be able to read some meaning into a second set of stats, even where there is no meaning.
Poor quality science can do that.
Solar hot water - Aquaponics - NFT worm
[Edit from the future - there is some additional material on NFT ]
That previous post was meant to go out 2 days ago, but I saved it as a draft instead of publishing it.
That sums up my life at the moment.
I'm in draft mode. I found one of my fish dead, on the concrete yeaterday. I'll post about it when I know a bit more about it.
 But I did take the time to check the water level in my NFT test, and discovered that not only was the water very hot, but there was a worm in it.
My worm looks like he's all broken and sore, but when I gently teased him out, it tuns out he was faking.
Perhaps he's in labour.
I've always thought that those large, white, thicker sections on a worm indicated the presence of an egg. (seen here on the left in pink)
One of the dangers in always thinking something, is that it might not be true. With anything you have known all your life, there is a fair chance your older brother was the source of the information at the worm wise age of five and a half.
I'll look into it, and if it turns out it's important, I'll let you know.
But the reason this post is in solar hot water, is than on a 17c day, I'm finding my water in the NFT tube, within the grow house, is 36c. I'm pretty sure worms don't like 36c so I moved him back into the main system. There is also the danger that something like a worm could block the plumbing and cause an overflow.
I'm guessing that's a little hot for strawberry plants as well, although they seem content enough.
That's not bad from a heat collecting position though, even if it isn't so good for a strawberry or worms position.
The strange thing is, I'm collecting all this heat from a white PVC tube, that I thought would be one of the cooler sections of my grow house. It's making me rethink the way I might go about collecting some heat to make a solar hot water heater.
The other strange thing is that the air temperature in the hothouse is 29c.
I think I might have a hot house within a hothouse situation going here.
If so it might be very easy to concentrate some pretty hight temperatures, making storage of the heat a lot more compact.
That previous post was meant to go out 2 days ago, but I saved it as a draft instead of publishing it.
That sums up my life at the moment.
I'm in draft mode. I found one of my fish dead, on the concrete yeaterday. I'll post about it when I know a bit more about it.

My worm looks like he's all broken and sore, but when I gently teased him out, it tuns out he was faking.
Perhaps he's in labour.
I've always thought that those large, white, thicker sections on a worm indicated the presence of an egg. (seen here on the left in pink)
One of the dangers in always thinking something, is that it might not be true. With anything you have known all your life, there is a fair chance your older brother was the source of the information at the worm wise age of five and a half.
I'll look into it, and if it turns out it's important, I'll let you know.
But the reason this post is in solar hot water, is than on a 17c day, I'm finding my water in the NFT tube, within the grow house, is 36c. I'm pretty sure worms don't like 36c so I moved him back into the main system. There is also the danger that something like a worm could block the plumbing and cause an overflow.
I'm guessing that's a little hot for strawberry plants as well, although they seem content enough.
That's not bad from a heat collecting position though, even if it isn't so good for a strawberry or worms position.
The strange thing is, I'm collecting all this heat from a white PVC tube, that I thought would be one of the cooler sections of my grow house. It's making me rethink the way I might go about collecting some heat to make a solar hot water heater.
The other strange thing is that the air temperature in the hothouse is 29c.
I think I might have a hot house within a hothouse situation going here.
If so it might be very easy to concentrate some pretty hight temperatures, making storage of the heat a lot more compact.
Solar hot water - Aquaponics - a day in the hot house graph
This graph really speaks for itself, but I like the sound of my own typing, so I'll be adding a bit as usual.

This graph represents my attempt to do something every hour, on the hour. If you click on it, it should open up to slightly bigger version that might be a bit more readable.
If you read all the times off the top line, you'll see I'm not so good at doing stuff to a schedule.
There was also a big chunk that should have extended out to the right for another 8 hours or so, but I went to sleep. Not a lot would have happened overnight. There have been some times where I have taken readings in the middle of the night, and the readings fit within a gradual decline over night to a point where they would roughly meet up with the 8am start data. I would expect the changes to be quite straight forward and gradual as the system radiated heat.
The cells with the yellow background represent daylight. Actual daylight at this time of year is from roughly 6:30am to 6:00pm. Roughly.
The solar heater output (graphed in yellow) comes about, as a result of a 10 metre length of 4mm black poly pipe, that I have coiled, and parked near the roof. It siphons a small trickle of water from the tap input to the glass house, up through the coil, then down to the fish tank. As far as I can see, I could just add a few more to shift any amount of heat I desire down into the fish tank, or storage, to be released slowly at night. Obviously there is a limit, but that limit comes down to how hot I want the air to be. I don't really know how hot a hot house should be, so I guess that's the next thing I need to study. It's one thing to decide to work on temperature stability, but I have a feeling I might be better off knowing the temperature I'm seeking to stay stable at.
It's interesting to note how wobbly the temperatures are outside, as compared to inside. Its also interesting to note that they seem to be getting even more stable over time.
Given I'm aiming for temperature stability, that's a good thing. I might not have to do as much as I thought. I might just have to sit down for a bit and wait.
I'm not very good at waiting, but I consider myself an expert at sitting down.
On this day, the hot house didn't see full sun until 3 hours before sunset, but when it has seen sun as soon as It could, it behaved by just being a bit hotter all round.
Sitting in a hot house is very, very nice.
Solar hot water - 30°C
This morning it was 8 °C outside in the world when I started the test. The maximum temperature for the day was 9.8 °C.
 Air temp in the collector was 18°C
 Air temperature within the poly pipe collector was around 23 °C
And the temperature within the water tank was around 9 °C
The water tank has developed a very slight leak so the water wasn't circulating until I topped it up, thus the temperature difference. Once flowing you can actually see it flow. You see it as heat haze emited from the inlet hose and as a current swirling little bits of gunk that I failed to clean out of the hoses.
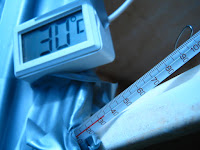 An hour and a half later and it reached 30°C inside the water tank, and 33°C within the collector.
As far as I know, my water didn't get any hotter than 30°C, but It stayed at that temperature, and still is at that temperature, even though the day became overcast and colder.
I took the temperature at the bottom of the storage tank as well and found it to be only 1°C less than at the top. This might mean I need a bigger storage tank to allow the heat to rise to the top. The flow might be enough to be stirring the water and mixing it too much. If it was a deeper tank, or the flow was less I might be seeing higher temperatures. Slowing the flow would be as easy as adding a tap. I'm not sure that I'll bother on this small test system. I think I have made the correct number of errors to allow myself to move on to the bigger version, and actually do something with the collected heat. 30°C is still 9 degrees short of my target but I think with a better made, and larger unit, 39°C should be achievable on a day like today.


And the temperature within the water tank was around 9 °C
The water tank has developed a very slight leak so the water wasn't circulating until I topped it up, thus the temperature difference. Once flowing you can actually see it flow. You see it as heat haze emited from the inlet hose and as a current swirling little bits of gunk that I failed to clean out of the hoses.

As far as I know, my water didn't get any hotter than 30°C, but It stayed at that temperature, and still is at that temperature, even though the day became overcast and colder.
I took the temperature at the bottom of the storage tank as well and found it to be only 1°C less than at the top. This might mean I need a bigger storage tank to allow the heat to rise to the top. The flow might be enough to be stirring the water and mixing it too much. If it was a deeper tank, or the flow was less I might be seeing higher temperatures. Slowing the flow would be as easy as adding a tap. I'm not sure that I'll bother on this small test system. I think I have made the correct number of errors to allow myself to move on to the bigger version, and actually do something with the collected heat. 30°C is still 9 degrees short of my target but I think with a better made, and larger unit, 39°C should be achievable on a day like today.
Solar hot water - Poly pipe collector
It was a chilly and windy day in the hills today. But the sun was out for a while in the morning.


The ambient temperature was around 11°C as I added the rest of the T junctions to my new poly pipe collector, and I was almost confident that I'd sooner or later, be making some solar hot water.
 The water temperatere was around 10°C from my rainwater tank.

 It was interesting to note the temperature of the collector was very close to the temperature of the storage tank, and the air temperature in the collector stayed low. (digital thermometer is testing water temperature and the glass one is testing air temp in the collector)
No doubt this means that the heat exchange area of the black poly pipe is sufficient. This came as a bit of a surprise to me, although in hindsight it would appear that the transfer rate is self governing to some degree. The hotter the water gets, the faster it will flow and thus the more heat exchange will occur.
Final temp before it started raining and I went inside was only 22°C, and it didn't get any higher in the overcast, windy and rainy conditions, even when I went outside hours later. But, I think it was actually a success. I doubled the temperature of the water and it only took an hour and a half.
Given I only used two sheets of corflute for insulation, and the insulation for the top, bottom, and sides was just tape, which isn't really insulation it's really just tape, It did about as well as I hoped.
The experiment served its purpose in that I learnt a few things and didn't cost anything as I'll be pulling it apart and using all the bits in the real thing.
Lessons learnt ...


 It was interesting to note the temperature of the collector was very close to the temperature of the storage tank, and the air temperature in the collector stayed low. (digital thermometer is testing water temperature and the glass one is testing air temp in the collector)
 No doubt this means that the heat exchange area of the black poly pipe is sufficient. This came as a bit of a surprise to me, although in hindsight it would appear that the transfer rate is self governing to some degree. The hotter the water gets, the faster it will flow and thus the more heat exchange will occur.
Final temp before it started raining and I went inside was only 22°C, and it didn't get any higher in the overcast, windy and rainy conditions, even when I went outside hours later. But, I think it was actually a success. I doubled the temperature of the water and it only took an hour and a half.
Given I only used two sheets of corflute for insulation, and the insulation for the top, bottom, and sides was just tape, which isn't really insulation it's really just tape, It did about as well as I hoped.
The experiment served its purpose in that I learnt a few things and didn't cost anything as I'll be pulling it apart and using all the bits in the real thing.
Lessons learnt ...
- Air bubbles are not your friend. Don't let them collect.
- You don't need a lot of tubing to shift a lot of heat from a collector.
- Insulation is amazingly important. (tape leaks heat so that you can feel it leaking)
- A tube based solar siphon regulates itself, so there wont be any issues with the collector overheating.
- Even at the rate this poorly constructed solar collector collected heat, it would still be worth using it as a bathroom heater or something*. On a bigger scale without changing anything except scale I could heat my house by building a wall out of water tank and simply circulating the water to my collector.
- Collecting free energy is a worthwhile pastime.
- I'm not very skilled at gluing.
- there was a reason I collected all that 19mm poly pipe for all those years, even though it had holes in it every few metres, and kinks in the sections between the holes.
*Hmmm towel heater...
Solar hot water - Poly pipe
My too hard basket brimmith over.
I have patches on my patched patches. I think it's time I gave up on my solar hot water heater.
And tried a new design!
 For a change I thought I'd try taking advice from people who know much more than I do. I thought I'd try a different method. There comes a point where a project can leak more than one can safely ignore. Especially when wiser folk are suggesting I try something else.
So the new plan is to use poly pipe hose fittings to pass the water through the solar collector. I'll use two layers of corflute to insulate.
Also, it's possible to be too frugal.
 Say, for instance buying enough T junctions to make only one half of my new design.
I'll get the rest tomorrow and test it rain or shine.
I suspect I'll need to add a second layer of these pipes in the grown up version to extract all the heat from the collector, but only a test will tell because I have no Idea how to calculate such stuff.
I have patches on my patched patches. I think it's time I gave up on my solar hot water heater.
And tried a new design!

So the new plan is to use poly pipe hose fittings to pass the water through the solar collector. I'll use two layers of corflute to insulate.
Also, it's possible to be too frugal.

I'll get the rest tomorrow and test it rain or shine.
I suspect I'll need to add a second layer of these pipes in the grown up version to extract all the heat from the collector, but only a test will tell because I have no Idea how to calculate such stuff.
Solar hot water - Blow torch and glue
Blow torches set fire to stuff.

It's raining a lot today. My new solar collector was still wet from yesterday's leaks and with the weather the way it is, doesn't look like drying any time soon. What I needed was a way to dry it and also a way to melt the glue to repair the leaks. So I did what anyone in my position would do. I pointed a blow torch at it. Just a tiny one. And just for a tiny time. And I melted just a tiny bit of my collector. But it was enough to make it look like a shower head when I put water in it to test it.
I wish I had some kind of drawing board to go back to.
Solar hot water - New, bigger corflute collector
It's still a test, but I've started making my new, bigger corflute collector.
 This time I'm using my new glue gun to make everything stick, and I'll be using two sheets of corflute glued on to the back of the collector as the insulation. By doing so I can make it a bit bigger than the first test, and make better use of my glass. I will glue the entire thing to the glass to give it some structure.
At the moment it's upright, full of water, and leaking all over my front steps.
It turns out making a solar hot water service involves an awful lot of water leaking out of stuff. In fact, generally speaking, I've noticed that a lot of my projects involve leaks.
This time I anticipated my poor craftsmanship, and held off on painting it until I had repaired the inevitable leaks. I've marked where the leaks are so it should be easy enough to fix them.
And I forgot to sand the surfaces so the glue would stick better. The hot glue gun glue sticks well to the corflute but does't seem to like the black hose. I suspect roughing up the surface a little will make it stick better.

Solar hot water - My first solar collector

Paint stuff.
I've never really been into painting things. I'm more of a "just let it rust" kind-a-guy. But now I'm not so sure. Very small sections of this thing actually look as if it were made by someone who could make stuff. And all it took was some black paint, and a camera that cant deal with contrast.
Now all those people who say things like "If a jobs worth doing its worth doing properly." don't seem quite as insane as they did in the past. It occurs to me that when this thing springs a leak, even though its just an experiment, I'm really going to regret that decision to use that old tube of silicone I had lying around. A piece of junk left behind your garden shed is just junk, but paint it, and you leave that same piece of junk in plain sight where it belongs.
I should put this to the test by painting pieces of litter I find in the street.
Tomorrow I test my painted junk to see if I can collect some heat.
Solar hot water - corflute collector part 3
Get ready for another riveting post on the corflute test collector!
 I mounted the collector into a foam box and painted it with blackboard paint. I told you it was going to be exciting.
 Now I'll stop watching silicone dry and watch paint dry for a bit.
Actually its starting to look a bit more like something that might actually work.
To date all the experiments with water involved, haven't worked as well as they might have, but I suppose I did actually learn a few things along the way. And that is the point. I'm just not so good at this waiting business. I tend to rush my waiting.
All thats left to do is put the glass on and attach it to the drink bottle. Today I'm off to get a broken hot water service I'm hoping to use as a storage tank for the hot water I create with the real system. Either that or just undo a few screws and then leave it in my back yard for 20 years.
Solar hot water - Corflute collector part 1
Corflute collector part 1 will indicate to all just how bad I am at applying old silicone sealant to a home made corflute solar collector.
 This gives some indication of the general idea. Tubes attached top and bottom will carry water up through hundreds of tiny tubes in the corflute (white thing pictured here side on) where they will be collected at the top into a bigger tube (black and end on) and sent to the storage tank. Actually that pic doesn't really look like its anything to do with this project but I promise it is. It's looking down the length of pipe that runs across the bottom of the sheet of corflute. The black hose will be siliconed on and a stopper put in place to block one end, and the inlet hose from the storage tank will be attached to the other end. The same will be repeated across the top)
My camera is really struggling to take pictures of the corflute, I think because its so bright white. (I might have to make photography a "thing").
According to the instructions there is meant to be a nozzle that isn't packed with solid dry silicone.
 My work looks nothing like the suggested use pictured on the tube. My work looks like leftovers from "ice your own birthday cake day" at an infant school.
Oh well. At least I'll get some more practice when I have to do it all over again tomorrow, after I test for leaks.

My camera is really struggling to take pictures of the corflute, I think because its so bright white. (I might have to make photography a "thing").
According to the instructions there is meant to be a nozzle that isn't packed with solid dry silicone.

Oh well. At least I'll get some more practice when I have to do it all over again tomorrow, after I test for leaks.
Solar hot water - Corflute collector part 2
No photo today because my photo-journalistic skills are simply not up to the task of making pics of drying silicone look interesting.
There were only two small leaks in my corflute collector, but they will take at least until tomorrow to dry so there will be a part three to the construction of the test corflute collector.
There were only two small leaks in my corflute collector, but they will take at least until tomorrow to dry so there will be a part three to the construction of the test corflute collector.
In spite of my poor craftsmanship I actually have a tip or two to pass on.
- Black hose is best worked after it has been laid out in the sun for a day or so to straighten it. Tie one end to a fence and the other to a brick or something, so you can pull it tight.
- If you cut the black tubing along the side of its natural bend it will sit straight against the edge of the corflute. For some reason its tempting to make your cut on the inside of the curve. Doing so will make your hose pull away from the corflute when siliconing.
- Get a grownup to do your silicon work if you are as unskilled as I am.
- Make sure your flutes go from top to bottom before you make any cuts or glue anything. I didn't make the error of getting it sideways, but I can imagine it would be a pain if I did.
- Create a slight slope on your top cut in the corflute so that any bubbles will flow up to the exit hose. Bubbles are not your friend and any place where air can be trapped will collect air as soon as your solar collector starts working.
- making solar hot water is much more exciting than I make it look in this list.
Solar hot water - Pre-heater
I have a perfectly good hot water service at home so I wont be throwing it away just yet. But I think I've decided on what I'll do instead. My plan is to make a pre-heater to heat the water that goes into my hot water service, so less energy is required to get my water up to temperature.
 I already have a working understanding of heat exchange principles, so I'll leverage my new knowledge and attempt to apply it to pre-heating my hot water inlet. By doing so I'll avoid having to make a solar collector that is capable of taking mains (in in my house mains-like) water pressure.
Currently my hot water service takes delivery of its water at around 13 deg C and then uses fossil fuel to heat it to something like 65 deg C. If I can collect some heat and store it in an insulated container, I should be able to make a simple heat exchange device to transfer that heat to the inlet water of my hot water service. If I can spare my hot water service the trouble of even a few degrees It will have been worth it. But I'm hoping to contribute more like half the energy required to make my showers hot. If I can do that I can feel a bit more confident that I can make a replacement hot water service when my existing one gives up one day.
I guess that means my official target for my inlet water temperature is a 26 deg C increase from 13 deg C to 39 deg C.
That should be easy enough in summer but it's moving towards mid-winter here so I will be very pleased if I can get even close.
Solar hot water - Corflute
Just as there is for most things in life, there is a product that seems to be perfect for collecting solar hot water. Luckily it's something people throw out because its also good for advertising.
 Corflute is a plastic product that we in the western world need a surprisingly large amount of. This is odd because we dont really use the corflute. We use it to make us want to use other things. Different things. Things other than corflute. We use corflute to make advertising signs. These signs are rarely, if ever, trying to sell us corflute. More often than not these signs are trying to sell us real estate.
A few days ago, when doing some research, a found a website where someone very clever had used corflute as a solar collector. Painted black, insulated, and covered with glass, this should make a very useful solar collector. I cant remember the website and have been trying to discover it again. If you know it, or you made it, please let me know and I'll link to it. The genius behind using this is in the plumbing. It seems a lot of people have made solar collectors from copper pipe. This involves a stack of soldering and a stack of time, money, and skill. I have time, but no skill and no money. Corflute is just what the doctor ordered. The secret is to cut some plastic hose lengthways, and slot this onto a sheet of corflute top and bottom. Silicone it all up and you are now the proud owner of a few hundred pipes all plumbed together. It should only take a few minutes and even fewer skills.
The plastic that corflute is made of doesn't conduct heat very well but its thin, and because each tube is square, and has a huge surface area of water carrying pipes that we can expose to the sun, it should work well.
If you need some corflute and don't want to pay for it, you could try putting your house on the market and stealing your own real estate sign from your front lawn.
Re-reading this post makes me wish I had arranged some sponsorship from whoever makes corflute.
corflute corflute corflute
Solar hot water - Lukewarm response
My first test of my experimental solar hot water system ended in disappointment.
 There are two pipes attached to the storage tank, one drawing cold water from the bottom, and one carring hot water to the top. Due to my overly hopeful construction technique, there was no way to remove the inevitable bubbles. The result was, as soon as the system started working, it would stop.
I managed to get from 12 deg C to 23 deg C but I had to remove the bubbles. That meant losing water and adding cold water to replace it. So I was back to square one again. I did that a few times and each time it would rise rapidly to 23 and then bubbles would collect again.
The other issue (actually there were many) was the flow was too low. If the system is working properly we should see the collector box being cooled by the water flowing through. Cooling one place means shifting heat to another. I was still getting readings around 70 deg C and I'm pretty sure they should have been more like 55 deg C.
I changed the top pipe entry point so that it no longer traps air bubbles. I'll test it again tomorrow. And I've just discovered I have a leak.
Solar hot water - Hot water system
If we create the bottom half of a thermosiphon by putting a black hose into a foam box and cover it with a sheet of glass, we will see the beginnings of a (hopefully) slightly efficient (albeit temporary and largely useless) solar collector.
 If we use a large insulated drink bottle to concentrate collected hot water as the top half of the thermosiphon, we will see the beginnings of a temporary and largely useless solar hot water system.
Its night time.
Its not collecting much heat.
It's not very well designed. There are bits where the tubes form loops, and all tubes go down in through the top. My head says it should work a bit. The rest of me is not so sure.
We shall see when the sun next shines.

Its night time.
Its not collecting much heat.
It's not very well designed. There are bits where the tubes form loops, and all tubes go down in through the top. My head says it should work a bit. The rest of me is not so sure.
We shall see when the sun next shines.
Subscribe to:
Posts (Atom)
Popular Posts
-
 You see CHIFT PIST a lot in the aquaponics forums and it means "constant height in fish tank, pump in sump tank". And its a very g...
 -
 The bell siphon was a clever thing for someone to design, and as such you feel a bit of that "clever" rub off onto you when you m...
 -
 A "bell siphon" is a device that automates the flooding and draining of an aquaponics grow bed, even though the pump is adding wa...
 -
 Apparently, marron come in two varieties. Hairy and not so hairy. Cherax cainii (smooth) and Cherax tenuimanus, or Margret River marron (hai...
 -
 A while ago I tried to make a fish fed fish feeder design that would allow the fish to feed themselves. I think It's made. I say ...
 -
 Painting lures is easier if you don't know how. I don't, so I'm already well on my way. I started by owning a printer. That ...
 -
 If you pump air down into a submerged tube, when the bubbles rise to the surface, by virtue of the fact that they take up some space, they c...
 -
 The good thing about growing things like potatoes in aquaponics is they grow like crazy. The problem with growing things like potatoes in ...
 -
 Wire is one of the greats. It's power lies in its ability to be made shorter and apply great tension, with the application of many small...
 -
 With a little practice its possible to make a screw. If you bend your wire into an eyelet, its possible to make a screw in eyelet. The use...