Showing posts with label Photography. Show all posts

Photography - My new macro-bot

I built a thing today.

It moves stuff in small increments using a small electric motor, in response to a users input.

I guess that means I've built my first robot.

Actually, probably my second.

Anyway...

My device looks like this


It also looks like this.

The bit with the "1" next to it is my previously built power supply that delivers 5 volts to my project.

The bit with a "2" next to it is the previously made PICAXE Proto Board that connects some input/output pins to my breadboard.

The "3" is the transistor bit, that powers the motor when the chip sends a signal to do so.

And the "4" isn't really visible. If you could see the "4", it would be next to the the switch that the user presses to make the subject move a tiny bit.

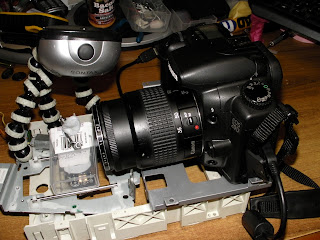
The point of this exercise is to attempt to make a device that carries an empty box of mints along a steady track, to carry a subject to different focal distances, in order to make a series of photos to create a focus stack, and thus create an image with a greater depth of field than might otherwise be achieved.

This absurdly simple solution, represents my first successful attempt at creating an electronic something without external help from someone, somewhere on the planet.

All the software does is wait for someone to press the button, then move the subject a tiny bit closer to the camera. This changes which bit of the subject is in focus, and enables the user to take a "stack" of pics, each one having a different plane in sharp focus. The user can then knit them all together using some free software, creating a photo with an otherwise impossible depth of depth of field.

The 11 lines of code that makes it work look like this (the very small amount of black text is the actual software, the green text is just my description of it)

--------------------------------------------------


; Macro Mover ver 2013 06 10 0200
        ;moves a small platform holding a photographic macro subject a tiny amount closer to the camera         '            each time a button is pressed, helping to create a "focus stack"
;120thingsIn20Years.blogspot.com
;no rights reserved
;use at your own risk

;For picaxe 08M2

#No_Data 'saves a few seconds when uploading the code to the chip, because it doesn't have to check for data

main:' begin the main program loop

if pinC.1 = 1 then gosub Move    'if someone is pressing the button, jump to the bit of code called "Move"

goto main ' if it gets this far, go back to the start and check for a button press again

Move: 'the bit of code that moves the platform with the subject on it

do until pinc.1 = 0 :loop ' hang here until the button is released

high 2 'turn on the motorconnected to pin 2
pause 2 ' wait for 2 milliseconds
low 2 ' turn off the motor connected to pin 2
pause 100 ' pause for 100 milliseconds

      return 'go back to the gosub that called the "Move" code

-------------------------------------------------


I started with an old CD ROM drive that I ripped all the interesting bits out of.

I think this is the original motor because it fits perfectly. This is the motor that made the laser head move from the centre to the rim. Now it's the motor that moves the photographic subject towards the lens, changing which bit is in focus.

The blu-tac is there as a weight to keep the linear cog in contact with the gear that the motor connects to.


So the motor makes the black bit move from this extreme...

(see the black bit)


to this extreme, but in tiny increments each time the button is pressed.

Each button press causes a a quarter of a millimetre migration.

.25 mm = 0.0098 inches

A tiny amount each button press.

The camera sits on the large grey platform to the right.


The software controls how much the motor moves at any given moment. This way we control how much we increment the slice of our subject that is in crisp focus.

The camera is securely set in place because there is a tight fit due to my bending some tags in order to hug the camera. There is also two lumps of blu-tac securing the camera to the base.

This arrangement feels totally secure, and I haven't had any problems with the camera moving.


Last, but far from least, I added a subject platform  and a light source. The subject sits on a platform made form an empty tic-tac (small mint confectionery) box,

The light source is the thing on three zebra legs.

It's best to move the light source with the subject as it moves toward, or away from the camera, to avoid photos with different exposures, so a light that moves with the subject is best.


Once you have a "stack" of photos with different bits in focus, you can knit them all together with a program like "MacroFusion" (free, open source program I run on my linux computer)

To use this Macro-bot device, you press down once or more times, on a button to move the subject a tiny bit closer to the camera. After each button press (or two or three) you take a photo. Each time you press the button, the subject moves a fraction of a millimetre. I found pressing the button once was suitable for macro shots where the lens was at full zoom, and pressing three times when the lens was at minimum zoom.

Some experimentation is required, but as soon as I made this, I immediately solved all the problems I was having with poor alignment of my photos in a focus stack.

Successful results to follow...


120 Things in 20 years - Sometimes, all you have to do to make a robot, is to replace all the bits from the robot you salvaged last week.


Photography - Hack a macro lens from a zoom lens

I decided to make a more permanent macro lens.

The improvised one here was just too crazy to use. Everything had to be held together with tape, string, and luck.

It turns out it's pretty easy to hack a macro lens, if you already have a short zoom lens you don't need.

There are a lot of canon kit lenses that came with the cameras floating around out there for only a few dollars. The best price I saw was $3.98 US.

The lens I'm using is a canon EF 35-80mm zoom. I got it for free from someone who paid around $5 for it in Japan.

 The first step is to find some screws that might let you get inside.

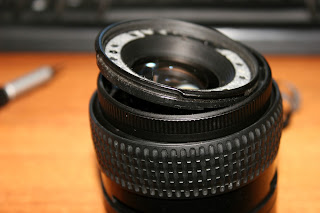
The object here is to remove the front lens element.

My screws were found under a sticker, but different lenses hide the screws in different places.


Removing the sticker revealed 3 screws.

The sticker is useless after you remove it, so don't try this unless you want the change to be permanent.

That's the wrinkled corpse of the sticker in the background.


Undo the screws.


This allows the top lens element to be removed.

This lens cluster does the focusing as far as I can tell.

At this point you can take a macro shot, but the lens will leak a lot of light onto your censor. The black plastic surround covers a gap between the outer lens casing, and the inner sleeve that controls the zoom.


In my lens, it wasn't possible to remove the lens from the plastic surround, so I had to cut it off.

If you were trying to do this as a temporary thing, and wanted to try it before you commit, all you need to do is cover the lens front with something light proof with a hole around 2cm in diameter in the centre.

I'm guessing gaffer tape would work well.


The main thing is to create a cover for the gap between the outer casing and the inner zoom sleeve.

The lenses are of no use, but the plastic surround is very useful, because it has a screw thread to take filters.

A clear glass filter, or a UV filter will be the thing that keeps dust out of the lens.

The large black plastic thing is the bit we are keeping.


There was an extra hole that I filled with a screw to keep everything light tight.


A clear glass filter, and it's all done.


The results are pleasantly surprising. The original lens could zoom into around 6cm in width. This is closer to 1cm.

The focus ring no longer does anything, but the zoom still zooms. 

There are two ways to focus. 

Moving the camera or the subject until the scene is in focus is where you start. The distance from the lens that the subject needs to be is only around 5cm. Once you have the subject roughly in place, you can use the zoom to change the point that's in sharp focus. 

The zoom also works as a zoom, and changes the field of view between 12mm and 25mm from one extreme to the other. ie at full zoom (as per the shot of the pencil, you can fill the frame with a 12mm object)

All in all, not quite as functional as a proper zoom lens, but for $5 it represents a pretty good compromise, and something I'd call a total success.


120 Things in 20 years - If canon just made the front lens element removable, I wouldn't have needed to do this lens hack to convert a zoom lens to a macro. 

Photography - Seeing what's inside a canon auto focus lens

Opening up my old camera in an attempt to fix a stuck lens didn't end well, but it did make me want to open other stuff.

A mouldy $5 canon EF 35-80mm zoom seems like a good candidate.

I actually made it work better than it did when I started.

That's officially a successful repair.

We don't see many of those around here.

Odd feeling.

It turns out I wasn't being all that original when I used a lens cleaning cloth to make my macro lens hack light tight. It seems canon does something similar with a rubber band.

I attacked the rubber grip of the lens by lifting it up with a small flat head screwdriver, and sliding it up to reveal the three screws that control the zoom function.


Once that was done, the lens started falling apart. All it took was finding where the screws were in the first place. All the places I was told to start by the Internet were all false leads. I'm guessing things like lenses are made by the lowest bidder at the time, so these things probably change design all the time.

The only real stumbling block was this very fragile looking plug.

Luckily I had uncounted them when I pulled apart my point and shoot canon digital, and discovered they weren't really all that fragile.

I covered it with a folded bit of paper so the pliers wouldn't scratch the circuit off and pulled.


I also tried to avoid touching anything that looked like it might be copper. I have a feeling that touching stuff might lead to corrosion.

Probably just being paranoid, but it wasn't any really effort to avoid it. I should buy some cotton gloves for this kind of thing.

The little plug looks like this when it's unplugged.

Robot's are probably better at putting stuff like this back together, so I took a lot of photos as I was unbuilding it, so that I might have a chance of putting it back together.

That's a tip.

Take lots of photos of things as you pull them apart.


One part that was really fragile was this little bit of kit.

It's like a switch that drags it's contacts along a curved section of circuit board tracks so that the contacts keep in contact when you rotate the lens to zoom.

Or perhaps they adjust the aperture as you zoom, as I've noticed the available aperture range changes from one extreme of zoom to the other.


Who knows what it's really for, but I bent it convincingly out of shape when I was putting the thing back together.

I managed to fix it, but two of the pins will never be the same again.

This is the rear element. (the bit you can see a lens in on the left)

It's a cluster of ... three I think it was... lenses (two at least, but I think one was made of two), that I think also contains the aperture control.

The aperture control stuff must be in there, because there was nothing else with electronics in the lens.


I think this is me taking apart the lens that was really two lenses.

This things all had mould, but the other side of the one you can see in this pic had the most.


This is what I decided was the aperture bit.

I hope this isn't too technical for the reader.

Is bit even a word in this context...


Anyway, the remarkable thing is, after wiping down all the lenses with a lens cloth, it was actually an improvement.

That's the before and after shots with this lens.

Most of the milkiness is gone, but there is still a bit of mould on the front bunch of lenses, but I think I might hack them off and convert this thing to a macro lens.


I've been reading up on lenses, and how to hack bits off lenses that you dont want, and turn them into lenses that you do want.

Anyway, not a bad outcome for a $5, brand name, auto focus, zoom lens.

I cant wait to cut bit's off it.


120 things in 20 years - Where you will still find someone who thinks a lens doing it's auto focus thing is excitingly like having a robot. You also might find someone interested in photography trying to open a lens to see if there really is a man inside who does the focusing. (there's not by the way)


Photography - Improvised macro lens mould study

I got another lens from a junk bin in a camera store.

This one is a canon f 1.4, 35-80mm zoom.

It has an auto focus motor that makes a sound a bit like you might hear if you put a blender in a blender, but the auto focus still works.

The bits that don't work so well, are the lenses.


The problem is mould inside the lens.

Not uprising for a 500 Yen lens sitting in the junk bin of a camera store in the country that invented humidity.


That's a ridiculously close up shot of the mould.

Ridiculously close up.


I don't have any way of doing macro shots with my new camera, so I had to improvise.

I took the shot of the mould with this home made bit of kit.

The blue lens cloth is there to keep the light out of the improvised macro lens, because the small length of toilet roll acting as an extension tube  isn't light tight.

The lens attached (that's a generous description) to the camera is actually on backwards, and is resting against the other end of the toilet roll tube.

The lens resting on the red kitchen scrubber is the new one with the mould garden inside.


The torch is a torch.

The torch is there because the camera's lens has the aperture set as small as it will go (f36) to try to get at least some of the mould in focus.

I didn't really achieve that.

The exposures were around 30 seconds long (many minutes without the torch), and other people were working in the house at the time. My desk is a wobbly kitchen table top heavy with old CRT computer monitors, and all the other junk I like to keep at hand. As as a result it amplifies any movement from people, traffic, and the fridge and freezer compressors.

If you put a glass of water on a desk like mine and look at the reflection, you will see the reflected image dance all over the place. Normally it isn't a problem, because the camera and lens would both move at the same time, but with this contraption, there was nothing of substance connecting the lens and the camera.

Tricky.

Anyway...

The lens has mould in it.

The image on the left was taken with the canon 18-55mm lens that came with the camera.

The image on the right is taken with the mouldy 35-80mm lens.

The camera was set to the same settings for both shots.


Mould is not a friend of the lens.

The point of all this, is to point out that I wont be taking an angle grinder to my lens in some future post  without reason.

Actually I'll try to open it up and clean it, but there is a fair chance it's bits of glass are coated in a very delicate plastic coating, called coating. If that's the case the mould may have become a permanent fixture by etching it's way into the coated bits.

The mould appears to be on only one element, so I might be able to salvage some other bits and make a proper, mould-free macro lens.


120 Things in 20 years warns that when I say "proper" I mean the improvised macro lens might employ slightly fewer toilet paper tubes, and where they are unavoidable, they might be made a bit less wobbly and light leaky.

Photography - New (to me) Canon EOS 20D camera

My new camera is a lot like my old camera in so far as they both take pictures, and they are both 8 megapixel cameras.

But after that they diverge a bit.

The Sanyo Xacti that I've been using for the last 1300 photos I've taken was gifted at me by someone (Thanks anonymous company) when I really needed a replacement because all the point and shoot digital cameras I've bought to make this blog (I think it's 3 now) fall over just after 5000 happy snaps.

5000 seems like a lot when I put it in print, but in terms of time, that equates to less than a year per camera.  Sure they cost less than AU$100, but I still want more than a year out of anything I buy.

This one that I've been using is still going strong, and does a pretty good job of it I suppose, but I found the interface very heavy going.

It has quite a few options and features, but all of them have to be accessed via a clunky multi-level menu system. That means that every time you want to do anything other than what it's set to do now, you have to explore a stack of menus to finally find what you need, and by the time you've found it, the ladybird has finished eating it's aphid, and flown away.

My new camera on the other hand is a zillion times better to work with. I've only had it for around 10 hours, but it already feels comfortable.

It's taken around 1200 pictures so far in it's life.

I have very greasy fingers.

I'm eating zucchini and haloumi fritters.

Delicious.


The new camera is a Canon 20D. It was originally sold for around AU$1500 (Australian dollar) in 2004, and was described as a "semi-professional" or "prosumer" camera at the time, which of course means substantially more than other imaginary words and their associated imaginary metrics.

But on the whole, the camera rocks.

That's my official rating out of 5.

It has a 4 GB CF memory card, which is the size of a bulky circa 2012 64GB mp3 player, and that cost around the same as a bulky circa 2012 64GB mp3 player. It takes a while to transfer photos, but it has very nice functionality, and best of all has an interface that works.

It also comes with some nice lumps of glass in the lens. It seems to be the lens that lets down lots of little point and shoot cameras. The quality of the photo's taken by my new 8 megapixel camera is a lot better than those I've taken with an 8 megapixel point and shoot style camera.

The second lens feels a bit like it might blow away, but at $10 it's a very nice thing to have around.

The camera came with a Canon 18-55mm f3.5 image lens, with image stabalizer. I've just discovered I love image stabalizing. Image stabalizing allows you to be a bit shakey, and have the lens do some stuff to fix it.

As I understand it, there are exactly two ways to do image stabilizing.

  • 1. Project an image onto the censor, so that the image is a little larger than the censor, and the image has some extra image in the margins. Then have the camera track your shakey projection, and then use magic or software or something to knit together a nice crisp image.
  • 2. Track some points on the image, and move the lens around a bit so that any given point on the censor always sees the same bit of the image, or move the censor to achieve the same thing.
  • 3. Use gyroscopes mounted on at least two axes to resist the movement of the entire camera. Things spinning around like to keep doing it. If you take the tire off your bike (stop first) and hold the axle while someone else spins it as fast as they can, it becomes difficult to change the angle it's on. This is why a spinning top (do they still have those?) stays upright, and is simply due to the universe being an amazing place.
Amazing!

The camera shows its age through it's 8 megapixelness, as at the time of writing, that's about 16 megapixels short of where it should be.

I bought it from a second hand camera store in Japan for $150 with the Canon 18-55mm zoom, and I got the second lens, a Tamron 100-300 zoom, for $10 from the bargain bin.

Thanks Tom.

Tom's a friend of mine.

He's really good at buying way too much camera gear from junk bins. His hobby includes buying those instamatic film cameras that were big in the 70s. He likes to buy them when they have rolls of film still in them so he can process the film. In some subtle way, that's slightly different from buying some old photos.

Which is nice.

For him.

He's kind of a time traveller, but he only gets to look, and doesn't get to choose what he looks at.

Mostly he gets to look at darkness.

Sometimes darkness, but with slightly mouldy edges.

Luckily, I don't suffer from collecting things other than my collection of odd people I know.

Tom's one of my favourites.

Thanks Tom.


120 Things in 20 years - One of the best parts about getting my new, second hand Canon 20D camera, was getting to look at the Japanese supermarket junkmail it was packed in. It's been 20 years since I was in Japan, and the junkmail paper is now of even better quality.


Bees - Cucumberic life without bees

The worlds bee population is in the process of being wiped out.

It's called "Colony Collapse Disorder",  which is the kind of name doctors tend to give things when they have no idea what the problem is, but want to be able to refer to it in an unambiguous manner that makes other people feel they know what the're talking about.

 Colony Collapse Disorder, or CCD is wiping out VERY large numbers of honey bee hives. People that keep bees professionally have closed up shop after losing all their bees.

A while ago, a clerk at the patent office named Albert said, "If all the bees were to disappear,  humans would have 4 years before we were wiped out.", but as far as I know he wasn't a bee expert, but was a very clever man.

The reality is that bees make food grow. almost all our food crops rely on the honey bee to make their fruit, nuts and seeds. Without them we will either learn to eat grass and ferns, or die.

In the last half of this summer, we have not seen a single bee.

I've been looking for them, and I'm pretty good at looking.

I hand pollinated half my cucumber flowers with a small artists paint brush, and left the other half to nature, and not one of natures flowers bore fruit.

Not one.

I'm trying to arrange some native blue banded bees to try to fix the problem.

Some time ago I set up a time lapse photography shot of some cucumbers that I thought I had hand pollinated, but half way through the shoot, I realised I had the memory stick that was for the camera on my desk.

Oh well. At least it wasn't as big a fail as the idiot that coded the little beep noise that tells you it's working. Their design work means the device continues to make the I've just taken a picture "beep" even when there's no card in the device.

Clever.

Anyway...

Here's some time lapse of the second setup where I used the plants that were not being hand pollinated. Pay particular attention to the 3 already formed little cucumbers just to the right of centre. (sorry about all the black dead space at the end, youtube's edit says it doesn't exist so you must be imagining it just like me) ...


youtube is giving me some grief. The clip works around 50% of the time in the different ways I test stuff.

This might work http://youtu.be/z85OlJScCEE

If it's not fixed soon I'll redo it.


Photography - Light

I have a photography tip.

Buy old slide projectors whenever you see them in a garage sale or whatever.

They are a really good source of light.

And of a colour, that if you put a slide of a nice day in them, they project something that looks like a nice day.

So...

Natural light

Naturalish.

And really bright.

Really less bright, if you drop in a filter or a paper towel, or some coloured cellophane or whatever else you might want to use. They have a purpose built slot that was designed to take a small square of something, and shine it's qualities onto something else.

Brilliant!

Or less brilliant.

Totally controllable!

Perfect!

$4 !

$2 if you haggle.

Don't haggle.

$4 is a good price.

They even have a focus dial.

Which is nice.

I guess.


120 Things in 20 years teaches that photography feels better if you give the slide projector guy the extra $2. It was the large flat screen TV of the 50s. He spent a lot on it.

Photography - Rock melon time lapse

 thought I might do a time lapse of a rock melon developing.

I'm not sure why, but I like rock melon a lot.

The might be called cantaloupe in your part of the world.

Either way, I have some growing.

The shot looks a bit like this.

 The white splodge at the bottom is the time lapse camera.

It's facing toward the extremity of the rock melon vine centre top.

The plan is to capture a rock melon forming from scratch.

Apparently I have around a month. With that time in mind, I've set the camera to take a frame every so often.

I really dont know how often, but having set it up, I'm loathe to change anything because it would mean the loss of all the pics to date.

That's the big problem with this camera. You don't really know when it's working or not. It even pretends to be working when there is no memory card installed. That means it seems to be working, and it only takes a month before you realise the thing doesn't have a card in place.

One month to take a picture of nothing.

Oh well. It hasn't happened so far, so I guess it isn't really a problem.

This is the topic up close.

Currently it's a hand fertilized flower in the last stages of it's flowery existence.

Hopefully, over the next few weeks, we will see a rock melon grow to harvest.

If not, there is a strawberry runner incoming from stage left that might make for a decent set of time lapse images.


Or not.

Who knows?

A month or so from now, all will be revealed.


120 Things in 20 years - Bringing you time lapse images of rock melons. That's it really. Time lapse images of rock melons.


Photography - Camera hacking


I've bought a new camera!

But more importantly for right now, my old camera didn't focus any more, so I thought I might pull it to bits to see if I could fix it.

A camera hack if you like.

Well it's hacked now.

But in the process of attempting to fix it, I thought it might be grit or something stuck in the focus gears. I figured I might be able to override the emergency shutdown on lens fail, and just use brute force to get past the grit.

But before pulling it apart I thought I'd look for a software hack to manually focus the thing. It's a Canon Powershot A490 point and shoot (or at least it was), so it doesnt normally have manual focus.

I found much more than a focus hack, but also much less.

Much less in that I still couldn't do manual focus, but so very much more in that I found CHDK - Canon Hack Development Kit.

CHDK is amazing. It's a kit full of files that you install onto your SD memory card, put it into your camera, then use the update firmware option (only seen on my camera when the CHDK is on the card) of your camera to install all the new functionality. It does things like...

  • motion detection
  • increment focus to automate focus/photo stacking as mentioned in the previous post
  • depth of field calculator
  • exposures from 2048s to 1/60,000s with flash sync
  • change the layout and visibility of you on screen display info
  • etc etc etc (so much more)
Look here to see a slightly bigger list, but still not all of it.

And here for the manual which covers more.

But even more can be found on the forum in the form of scripts that can be loaded into your camera. There are scripts that do motion detection fast enough to catch lightning strikes. (less than 60ms I think it was - dont quote me)

So in spite of just buying a new camera, I'm off to see if the $20 camera I saw in the electronics shops bargain bin is a cannon powershot. 

120 Things in 20 years CHDK camera hack - Awesome. 

Photography - Photo stacking


I've been reading a bit about photography, and discovered this thing called "photo stacking".

It helps you create super close ups that have everything in focus.


Normally in a photo, you get some bits in focus, and some out of focus.

This can be a good thing, because you don't always want, for example, the background to be sharp.

Sometimes things look better when you cant see them.

But sometimes you want to see it all.


I'll drop a series of seven photos here with each one seeing a different section in focus.

This first pic of a 300mm ruler is taken at a focal length of 10mm.


This next pic is at 20mm

You can see that the section that's in focus has moved a little further back.


This one at 50mm


 Here are three more in the series with each one seeing the focal length change through 100mm, 150mm, 200mm, and 300mm.

I would have preferred to use increments of 5mm all the way through, and take 60 photos, but this camera I have only deals with those photo lengths when used in manual focus mode. 

There is software that is free and open source, that can take the best bits of each photo, and knit them all together to make one photo. 

Apparently it's possible to do this in a graphics program, but I dont have the skill set, and the software seems to work. 

There are a few different software packages, some that cost and some that are free. The one I'm playing with is called, CombineZP. All you have to do is select the photos (New), then chose something that I dont understand called, "align and balance used fra..." (the title of this function is cut off because whoever made it doesn't respect my inalienable right to resize whatever window I want, and my screen size isn't the same as theirs), then click something that makes perfect sence that says GO.

After a few seconds wait, the end result is pretty good for a first attempt, and might just prove to be a very useful tool in trying to capture extreme close up shots. 

I'm guessing it would be perfect if I just had a camera that could deal with letting me chose where to focus all on my own. 

Even without respecting my free will, the result is quite good. You can see in the photo below, some bands of blur where I couldn't divide the focal length and add another frame. There's an obvious blur between the "k" and "i", and another at the "3" in 300. Another at 250, but they are all errors caused by my camera not letting me take pictures in between the ones I took. 

'Tis an interesting bit of kit, and I thoroughly recommend trying it if you are taking macro shots. 
 
The result...


120 Things in 20 years - I love discovering new things like photo stacking for macro shots, and I love discovering that there are only 6 photos in my series of 7. I deleted one, and have no idea which one it was, so I moved on. 

I'm also without confidence that I'm using the words "focal length" properly. 

Aquaponics - Cherry tomatoes

Those crazy cherry tomato plants I have growing directly in my fish tank water are producing some really nice fruit.

This bunch looked like a likely candidate for some photo's so here they are...


Electronics - Infinite battery life camera

I've had to make a few compromises with version 2.0 of the demand feeder.

One is that I've re-written the code and made it a lot more simple than it was originally. I've still got the old code, and I'll use it and post it when I make it a little better, but the full version resets each day at dawn as one of the overfeeding protection measures. I only have two silver perch in a 100L fish tank, with 300L of filtration media, so they can have as much feed as they like. To encourage the pressing of the button, I've made it so that they only get a small amount of feed each time, but they have the opportunity of more feed after only eight minutes since the last feed. The point of making a simpler version of the software was so that it would keep a running total of all events like the number of times the fish have hit the feed lever when the light is lit, and the number of times when the light isn't lit.

The fish pressed the lever only once in the 24 hours since I added it to the system. This may have just been a tail swipe, but it would have delivered feed, so some reinforcement of the behaviour of getting at least near the lever has begun!

It wont take them long to get the hang of it.

I ran the camera until the batteries were dead last night, but the hit must have happened some time since dawn while the camera was on charge. To solve this two hour filming limit, I created this.

It's a camera taped to it's battery charger, that is in turn taped to a tripod.

I plugged it into the earth leakage safety switch that the rest of the system is plugged into.


It blends in a bit with the actual feeder, but that's the feeder with the birds nest of wires sticking out of the back of it. The orange looking light under the camera is the LED that tells the fish feed is currently available. The red light at the top is the power on LED, and the yellow one is flashing out the number of feeds allowed in a day (even though the thing no longer resets after a day, so really it shows the number of feeds allowed ever). There are also LED's that flash out the number of feeds so far, the feeds remaining, the number of attempts made at the lever when food isn't available. That is when the feed LED isnt lit, because they just fed recently. And one more that flashes out the size of each feed that's delivered. The size is measured by how long the motor is on for, and doesnt actually represent the amount of feed, but on average, should spill a predictable amount each time. Currently, they would get around 5-8, 3mm pellets each time they hit the lever.

Hopefully, I'll have some video soon.


120 Things in 20 years - Electronics - Infinite battery life camera - This project is far from finished.

Photography - Time lapse camera

Someone nice gave me a new camera today.

Thanks someone nice.

It does time lapse photography.

You set it to take a shot every 30 seconds or whatever (30 seconds to 990 minutes), and when you feel like it, you turn it off pull out the memory card, and knit them all together with some software * so you have a movie.

It looks like this.

I've played around with it a bit, and so far the results are excellent.

It was given to me, so I have no idea how much it cost, but they tend to be called "garden cams". A search for "garden cam" will see you on the right track.

With a name like that, clearly they want me to film some aquaponics growth.

Mine is made in china and the box is labelled "Live Cam".  If you do a search for "Live Cam", you get a list of every porn site in the world.


I cant endorse it, or any of the garden cam things mentioned, because I dont know how much mine cost, I haven't used any others, and I never said I would, but I'm pretty stoked at having one to play with. From the size of the jpg's it makes, It's around a three mega pixel camera, so it should make for a reasonably decent film. It's not going to be Imax or anything, but it should be a few million times better than your average liquor store hold up security camera footage.

I suspect it will end up pointing aft, mounted on the back of my little boat for the duration of my planned, epic Murray River adventure.

I've really got to get to work on that boat.

Anyway, this version has a micro SD card slot which means it can hold up to 32 gig of pictures. I just worked out how many 4 meg photo's that is, but I closed the calculator without looking at the result, and I never go back.

So...

You'll have to work that out for yourselves.

It should hold a day's worth, and hopefully the batteries will also last a day at least. I suspect the camera goes into a sleep mode (otherwise the 990 minute setting would be a little pointless) where it doesn't draw a lot of power, but I'll be taking my trusty laptop (that was ripped from the jaws of landfill, and must be 20 years old), so charging (via USB) and emptying the memory shouldn't be an issue. Although, come to think of it, I think the new camera has more memory than the old laptop.

I'll work something out.

On a side note, and interestingly, you can drag a photo of a product into a web page showing google images, and it will search the net for images that match. I recently used it to find all the different labels that my new tent is manufactured under to see how much I got ripped off. (turns out I didn't)

But generally speaking it's a good thing to do before you buy rather than after to see if you got ripped off.

So, if you want to buy a toaster that burns tomorrows weather forecast into your toast, the same device might be marketed under three different labels, at three different price points. The exact same device, made in the same factory, not some kind of poorer quality knockoff.

It's a crazy, crazy world in which we live.

So get the photo, and save it to your desktop, then open google search, then click "images". ie go to google image search. Now grab your pic from the desktop, or another browser tab (you don't have to save it to your desktop (in chrome at least), and drag it into google image search.

It will find all the other versions and brands of your product that are using the same, or similar promotional pics.

Try it with the next product you buy, and depending on where you shop, you may be pleasantly surprised, or utterly disgusted with the universe at large.

You can also try it with a person's image, but it might make you sad. Most peoples's secret lives are very, very, boring.

Stupid universe.


*I use OpenShot Video Editor - a free, open-source video editor for Linux licensed under the GPL version 3.0


120 Things in 20 years - Photography - Time lapse camera. We humans are just like ants, but with no sense of humour.


Photography - Time lapse caterpillars

My old phone's camera didn't quite behave as it should have.

Each time it went on to the charge cycle it would shut down the camera.

I did manage to get some photos, although I haven't yet explored ways to knit the individual photo's into a video stream.


I had plans of rigging the phone to the back of the boat for my epic Murray River adventure, and adding as large a memory card as I could.

That way I hoped to be able to catch the entire journey, how ever long it might turn out to be.


I think I'll still want to do something along those lines, but now I might have to buy a purpose built device to achieve the same thing.


It's a shame my little test run didn't work, because in the end the caterpillars started to do the transition thing.

It's not very clear because they moved too close to the lens, but they have started to lay down silk to make somewhere to live while they become whatever it is they are going to become.


120 Things in 20 years - Making the sacrifice of wearing dirty clothes, so that the reader might enjoy failed, but shake free, caterpillar time lapse photography, foolishly set up on top of the washing machine.


Photography - Time lapse

Ages ago, the nice young lady we know who swapped her iPhone for my home made burger, gave me her old phone. She didn't need it any more because she had just signed up for the iPhone.

Today I discovered a very cool function on the old phone. It turns out you can set it to take six photos with however long a pause you desire between each pic. It says that if you hold the button down it will keep taking photos until the memory runs out.

I plugged it into the charger so it wouldn't run out of power, stuck a 4gig memory card in, set it to take photos every 5 minutes for a few days, and then thought about how tired I'd get holding down the button.

The result was a cable-tie, and a toothpick, to jury-rig a finger.

Now I have to wait 35 minutes to see if it's still taking photos after the first 6 that happen automatically. I wish the people who went to all the trouble of making such a cool function would have considered how much better having a "run forever" option might have been without the user having to invent a fake finger.

Nobody can hold a camera still for more than a 30th of a second. Never mind 7 days.


So for a subject, I thought I'd drop two big fat caterpillars, and a capsicum leaf into a jar, and see if I can catch them turning into whatever it is they turn into.

If all goes well with this test, I'll need to figure out a way to knit the images together into a movie.

When that works, I have bigger and better plans, but for now...I wait.


All the fun of waiting for live, time lapse photography, here at 120 things in 20 years

I'm back

Escargot


I'm back.

Or so it seems.

I won a photo competition. Which is nice. I found some landscapes in my aquaponics system and spent a few hours with the camera. The pic that did it was the one above. It's a photo of my small blue barrel aquaponics test system. That's one of my little silver perch featured in the foreground, and the black algae 45cm away on the rear wall of the blue barrel is exactly that.

What a difference a frame makes
 For those that care about such things, the pic was taken on a little digital happy snap Canon PowerShot A490 on auto mode (with some adjustment of the flash output by partially covering it with my finger) no post production was done, other than cropping the image a bit to get rid of the edges of the barrel and the water flowing in as these things ruined the illusion. So basically the image was just taken and not interfered with. The photo to the left is not the one it was cropped from, but shows what the scene really is.

And they say photos don't lie.


I've also moved home. We are now conveniently close to some things that are good to be conveniently close to, and depressingly far from some other things that we loved.

In the time I spent away I didn't do much of interest, and almost totally failed to learn anything new, so you haven't missed anything by my lack of posts.


Because of my new location, I don't think windmills are going to be acceptable. So I'm thinking of growing some snails. Snails tend to be a bit quieter than windmills. Is quieter a word. It should be. There are already stack of snails in the new backyard so I'm off to a good start. I know a bit about snails, but I want to develop a new way of growing them aquaponics style.

Part of the problem is the lease on my new home explicitly states that there are to be no fish. Inside, or out, so I'm hoping to power my veggie garden with snail poop.

Oh well.

Stay tuned for more "Things".

Popular Posts