I've had an idea.
I had my duckweed tank connected to my fish tank via a no holes siphon (a tube full of water with en end submerged in each container). This saved the day when I had a spill from my strawberry tower.
The level in the fish tank and the level in the duckweed are always kept exactly the same, so if I add water to the duckweed tank, it flows into the fish tank, until equilibrium is reached. This means the duckweed tank breathes in and out with the fish tank.
That all works well, but I would prefer to have the duckweed tank full, to add extra thermal mass to the grow house and keep temperatures more stable.
So what I thought I'd do is make a flexible hose from the bottom the duckweed tank go over to the fish tank, but instead of submerging the end, I'll add a float, and a vertical pipe. If I cut the pipe at the same height as the duckweed tank water level when the float is floating in a full fish tank, I think water should flow from the duckweed tank into the fish tank if the water of the fish tank gets too low.
I think.
Or something.
Definitely something interesting or not should happen.
I'll try it.
If it works I'll explain it better.
Aquaponics - strawberry pollination thoughts
Some of my strawberries are a little odd in the way they are forming. Some didn't form at all.
I put the not forming at all problem down to poor pollination. It always seemed to be the ones hidden under leaves or pressed against the corner of the scoria and the side of the barrel.
 I have a feeling the poorly formed ones might also be a pollination issue.
As I mentioned in a previous post, strawberries are not really the fruit, they are a fruit holder, the fruit are the little dots on the surface, and they each hold a seed.
In this pic we can see a crease where the strawberry isn't big and red, and we can see the dots that are actually the fruit, are tiny and not formed. I have a feeling these are fruit that didn't get pollinated. When none of them get pollinated, it might explain why I get no "fruit" at all.
 All my latest strawberries look like this, and are fast becoming the highlight of the grow house.
I don't actually know if this is a pollination issue, it's just a thought.
Unfortunately when I was between grow houses, there were some strawberry plants that lived in a NFT tube for four days with no nutrient rich water flowing around their roots.
This has left the roots dried and not looking too healthy. The plants are wilting, and the existing fruit on those plants is drying up and looking a bit sad. They are trying desperately to make a comeback, and my aquaponics system has seen some amazing comebacks, so there is still hope, but I think I may have lost out on the bumper harvest I might have had.
I'm adding some water by hand to These plants because I'm concerned that the roots that are touching the water might actually be dead.
Only time will tell.
Home-grown strawberries are delicious.
I put the not forming at all problem down to poor pollination. It always seemed to be the ones hidden under leaves or pressed against the corner of the scoria and the side of the barrel.

As I mentioned in a previous post, strawberries are not really the fruit, they are a fruit holder, the fruit are the little dots on the surface, and they each hold a seed.
In this pic we can see a crease where the strawberry isn't big and red, and we can see the dots that are actually the fruit, are tiny and not formed. I have a feeling these are fruit that didn't get pollinated. When none of them get pollinated, it might explain why I get no "fruit" at all.

I don't actually know if this is a pollination issue, it's just a thought.
Unfortunately when I was between grow houses, there were some strawberry plants that lived in a NFT tube for four days with no nutrient rich water flowing around their roots.
This has left the roots dried and not looking too healthy. The plants are wilting, and the existing fruit on those plants is drying up and looking a bit sad. They are trying desperately to make a comeback, and my aquaponics system has seen some amazing comebacks, so there is still hope, but I think I may have lost out on the bumper harvest I might have had.
I'm adding some water by hand to These plants because I'm concerned that the roots that are touching the water might actually be dead.
Only time will tell.
Home-grown strawberries are delicious.
Aquaponics - Karmic debt
My karmic credit must have been good over the last 24 hours.
Two potential system disasters averted by a stack of luck, and a few minutes.
The first was yesterday, and involved my NFT tubes being fed too much water, and getting too heavy at one end. The flimsy stand they are now on was even more flimsy yesterday, and it gave way. The result was 3 horizontal grow tubes all standing on end, in a desperate attempt to mimic their strawberry tower cousins on the other side of the grow house. The pump was delivering between 50 and 70 litres per hour and was, of course, carrying on as if everything was fine. Lucky for me, I happened to be out there and quickly made myself into a table and called for help to turn off the pump.
A close call.
 This morning I went outside and found water all over the floor and a steady flow from the strawberry towers to the ground.
That's often a bad sign in aquaponics, but it was still flowing, a flow is a good thing in aquaponics.
Flow is a better sign than flood is bad.
Which is nice.
 The water was flowing freely out of the lowest strawberry hole on the first strawberry tower.
The culprit turned out to be two small pieces of scoria that had found a way to block the exit hole.
I saw them in there the day before, but for some reason didn't do anything about them.
I've since removed them.
 The fish tank got very low.
Low enough so that a fin was out of the water on my biggest fish.
But not quite low enough for the pump to start sucking air. I still had half an inch of water before that happened.
Given it was only the water from one strawberry tower, I figure I had about 15 minutes spare before the pump would have been damaged, and the fish would have been walking.
We all know fish hate walking.
This is what's known on the forums as an HSM!*
I was very, very lucky.
Twice.
Still there was the problem of water. Refilling the system from the tap would have been just as bad for the fish as not having water at all. They would all die from temperature, pH, and chlorine shock.
But I managed to scrounge some water from within the system.
I turned off the strawberry towers, and the NFT tubes. I run the NFT tubes half full of water so there was around 10 to 15 litres there. I also took the stand pipe out of my grow bed and let that drain completely. That gained me another 30 litres or so because I run a shortened siphon so that the bottom 3/4s of the bed is in constant flood. I also had the water from the duckweed tank. That is what saved the day, because although now nearly empty, it had been topping up the fish tank water until the end of the hose found air and the siphon broke. But I drained what was left of that and added that to the fish tank as well. That got me an extra 20 litres or so. I also added 5 litres of water from a plastic tub I filled a few days ago. So most of the water was already system water, so the fish shouldn't have any problems with it.
 My final recovered level looked like this.
Which was a pretty good result and would allow me to turn the system back on.
Success!
Way too close for comfort.
 But...
This is what the water looked like.
Not so nice
 But I soon noticed some fish.
 And then this.
Total time between these three photos was...
37 minutes and 19 seconds as checked by their time stamps.
I thought I was in for days of trouble followed by sick fish.
Everyone seems happy and (I think) all is well.
I need a solution for this kind of thing, and it was crazy of me to not have a second exit flow from each strawberry tower.
So close.
*Holy Ship Moment
Two potential system disasters averted by a stack of luck, and a few minutes.
The first was yesterday, and involved my NFT tubes being fed too much water, and getting too heavy at one end. The flimsy stand they are now on was even more flimsy yesterday, and it gave way. The result was 3 horizontal grow tubes all standing on end, in a desperate attempt to mimic their strawberry tower cousins on the other side of the grow house. The pump was delivering between 50 and 70 litres per hour and was, of course, carrying on as if everything was fine. Lucky for me, I happened to be out there and quickly made myself into a table and called for help to turn off the pump.
A close call.

That's often a bad sign in aquaponics, but it was still flowing, a flow is a good thing in aquaponics.
Flow is a better sign than flood is bad.
Which is nice.

The culprit turned out to be two small pieces of scoria that had found a way to block the exit hole.
I saw them in there the day before, but for some reason didn't do anything about them.
I've since removed them.

Low enough so that a fin was out of the water on my biggest fish.
But not quite low enough for the pump to start sucking air. I still had half an inch of water before that happened.
Given it was only the water from one strawberry tower, I figure I had about 15 minutes spare before the pump would have been damaged, and the fish would have been walking.
We all know fish hate walking.
This is what's known on the forums as an HSM!*
I was very, very lucky.
Twice.
Still there was the problem of water. Refilling the system from the tap would have been just as bad for the fish as not having water at all. They would all die from temperature, pH, and chlorine shock.
But I managed to scrounge some water from within the system.
I turned off the strawberry towers, and the NFT tubes. I run the NFT tubes half full of water so there was around 10 to 15 litres there. I also took the stand pipe out of my grow bed and let that drain completely. That gained me another 30 litres or so because I run a shortened siphon so that the bottom 3/4s of the bed is in constant flood. I also had the water from the duckweed tank. That is what saved the day, because although now nearly empty, it had been topping up the fish tank water until the end of the hose found air and the siphon broke. But I drained what was left of that and added that to the fish tank as well. That got me an extra 20 litres or so. I also added 5 litres of water from a plastic tub I filled a few days ago. So most of the water was already system water, so the fish shouldn't have any problems with it.
 My final recovered level looked like this.
Which was a pretty good result and would allow me to turn the system back on.
Success!
Way too close for comfort.

This is what the water looked like.
Not so nice


Total time between these three photos was...
37 minutes and 19 seconds as checked by their time stamps.
I thought I was in for days of trouble followed by sick fish.
Everyone seems happy and (I think) all is well.
I need a solution for this kind of thing, and it was crazy of me to not have a second exit flow from each strawberry tower.
So close.
*Holy Ship Moment
Aquaponics - Bottomless cup transplanting method
I've had an idea.
I've decided to go with plastic cups as pots for my NFT tubes and strawberry towers. They cost four cents each, and are food safe. Or at least I can reasonable expect them to be food safe.
I drill holes into the bottom of a stack of ten cups at a time so they are quick to modify, and fit the NFT holes well.
But that's not the idea.
It turns out that you can get pretty good growth with more than one plant in even a tiny plastic cup. There is always enough nutrient getting to the plants because there is so much of it around. The problem is, it's a bit tricky to plant two or three seedlings into a little pot. I tried holding the plants with two hands then adding the grow media with a third, but didn't get far with that plan.
So then I tried this...
 I cut the bottom out of a cup, and sat it lightly inside another cup with holes drilled into the bottom that would end up being the pot.
 This allowed me to sit my three seedlings in place, and at just the right height, being supported by the bottomless cup.
 Then I can add my media to the bottomless cup without burying the plants, and I also get to keep keep the roots down where they should be.
 Once the bottomless cup is filled to the desired height you gently lift it out, leaving the media behind.
 A gentle and rapid transplant that handles the plants as little as possible.
But I wont be using it, because I plan on planting seeds directly into the media.
I've decided to go with plastic cups as pots for my NFT tubes and strawberry towers. They cost four cents each, and are food safe. Or at least I can reasonable expect them to be food safe.
I drill holes into the bottom of a stack of ten cups at a time so they are quick to modify, and fit the NFT holes well.
But that's not the idea.
It turns out that you can get pretty good growth with more than one plant in even a tiny plastic cup. There is always enough nutrient getting to the plants because there is so much of it around. The problem is, it's a bit tricky to plant two or three seedlings into a little pot. I tried holding the plants with two hands then adding the grow media with a third, but didn't get far with that plan.
So then I tried this...
But I wont be using it, because I plan on planting seeds directly into the media.
- My 8 pots at a time will be planted with seeds in individual cups.
- These will be placed into a partially buried empty 2L ice cream container with holes drilled in the bottom in the main grow bed. They will be packed tightly together and taking up a small amount of space.
- Once large enough they will be transferred in their same pots into the original small NFT tube with holes very close together.
- When they outgrow their small homes, they will be moved into the main NFT tubes.
- Eventually I'll add another 4 tubes of 10 holes each to the growhouse, and another icecream container seed raising bank to the grow bed. That will give 90+ (I think) in total, plus the main original grow bed.
Aquaponics - Strawberry towers and NFT tubes.
Success! Mrs 120ThingsIn20Years and I finished renovating the growhouse.
 It looks like this.
Sorry for the poor quality photo. It got dark whilst I was having a rest that turned into a sleep.
Rests can do that.
 The new NFT tubes addition looks like this, and is mainly comprised of half a dozen holes with beans at the back so I can climb them up the wall, half a dozen holes with coz lettuce in the centre, and half a dozen of baby spinach. There are a few other things sprinkled in between, and where ever they would fit.
 The strawberry plants have all been transplanted.
Those that were in my original little test system should have transplanted without stress because they were already in my modular transplanting pots, but it took me so long to finish the redesign that they spent a little time walking around on dry land.
Not happy plants.
The ones I ripped from the main grow bed and transplanted with bare roots, seem to be just fine.
 The original system is a wreck. I did a lot of damage moving it around and getting in behind it to tie down the growhouse structure to a fence.
The end result is a bit sad looking, but it will bounce back.
Along the right side, I planted peas that will climb the wall next to strawberry towers, (to right of frame) and the cascading plant at the front left is the oregano I rediscovered in the centre of the overgrown bit under the tomato. Actually there are two tomato plants in that lump, and I damaged the third too close to the roots to save it, so it's now worm food.
Someone from a university is coming to peek at the system tomorrow. I hope he didn't want it to look pretty. Oops. He's looking at lots of local systems, so no doubt he will be used to seeing systems in a state of constant rebuild.
The plants in the back left corner are some flat leaf parsley, and the base of a store bought bunch of celery that I thought I'd plant. It had no roots and no leaves, but It's doing quite well.
Aquaponics can do that.
Not just Aquaponics - Strawberry towers and NFT tubes - http://120thingsin20years.blogspot.com/
.

Sorry for the poor quality photo. It got dark whilst I was having a rest that turned into a sleep.
Rests can do that.


Those that were in my original little test system should have transplanted without stress because they were already in my modular transplanting pots, but it took me so long to finish the redesign that they spent a little time walking around on dry land.
Not happy plants.
The ones I ripped from the main grow bed and transplanted with bare roots, seem to be just fine.

The end result is a bit sad looking, but it will bounce back.
Along the right side, I planted peas that will climb the wall next to strawberry towers, (to right of frame) and the cascading plant at the front left is the oregano I rediscovered in the centre of the overgrown bit under the tomato. Actually there are two tomato plants in that lump, and I damaged the third too close to the roots to save it, so it's now worm food.
Someone from a university is coming to peek at the system tomorrow. I hope he didn't want it to look pretty. Oops. He's looking at lots of local systems, so no doubt he will be used to seeing systems in a state of constant rebuild.
The plants in the back left corner are some flat leaf parsley, and the base of a store bought bunch of celery that I thought I'd plant. It had no roots and no leaves, but It's doing quite well.
Aquaponics can do that.
Not just Aquaponics - Strawberry towers and NFT tubes - http://120thingsin20years.blogspot.com/
.
Aquaponics - Strawberry towers Mk 237 part three
OK now I'm really tired.
Big day.
And on top of my big day I did lots of cutting a drilling.
 And I made this.
It seems to work.
I was cutting and drilling other stuff.
Sleepy now.
Big day.
And on top of my big day I did lots of cutting a drilling.

It seems to work.
I was cutting and drilling other stuff.
Sleepy now.
Aquaponics - Strawberry towers MK 237 part 2
I'm getting there.
It's taking forever, but I'm getting there.
 Stage two sees me with a stack of finished end caps with their various pipe work siliconed into place.
The ones with the two pipes are to be the horizontal NFT pipes.
I built an overflow pipe into my first NFT test pipe, and it's saved the day a few times.
I arranged the normal flow so it exits under water so I cant hear it, and the overflow so it splashes as a warning that the tube is blocked,
 Never use a ruler when you can use a laser, and a ruler. My mum gave me this laser straight line tool, and It's a pretty handy thing to have. If your mum hasn't given you one of these, you can place your pipe next to a door frame or something else you think might be straight, and draw a line down the length of your pipe by holding your pen flat against the frame.
 If your hole cutter is anything like my new one, (my old $7 hole cutting set dissolved in a spectacular "it's a good thing I always wear safety glasses" kind of way), it will be impossible to remove the circle of PVC that will be left behind in the cutter. But I have a tip...
A hole cutter has a small drill in the centre, and then a large round bit with a saw edge. Drill through until you have the beginnings of a circle cut into your PVC, then withdraw the cutter a bit and waggle your drill around so that the guide hole is enlarged. You no longer need the guide hole because you now have the larger circle, so it wont matter. It's the guide hole that the circle offcut of plastic seems to get stuck on. After discovering this they all fell out without any help.
 Lastly I drilled some holes in my gutter to take the tubes exiting the bottom of my strawberry towers.
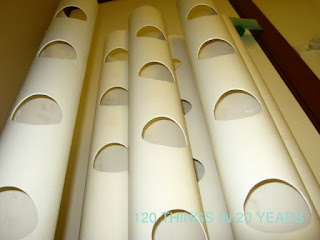 My finished, but as yet un-siliconed tower components look like this.
Getting there.
I cut 5 holes in each 900mm long tube. The top hole is 100mm from the top to allow a litle space between the plant and the grow house roof, and the bottom hole is 150mm up from the bottom to keep the roots out of the drain holes.
I'm not sure how the drain bit is going to go, because I have no idea how long the roots are going to be.
.
It's taking forever, but I'm getting there.

The ones with the two pipes are to be the horizontal NFT pipes.
I built an overflow pipe into my first NFT test pipe, and it's saved the day a few times.
I arranged the normal flow so it exits under water so I cant hear it, and the overflow so it splashes as a warning that the tube is blocked,


A hole cutter has a small drill in the centre, and then a large round bit with a saw edge. Drill through until you have the beginnings of a circle cut into your PVC, then withdraw the cutter a bit and waggle your drill around so that the guide hole is enlarged. You no longer need the guide hole because you now have the larger circle, so it wont matter. It's the guide hole that the circle offcut of plastic seems to get stuck on. After discovering this they all fell out without any help.


Getting there.
I cut 5 holes in each 900mm long tube. The top hole is 100mm from the top to allow a litle space between the plant and the grow house roof, and the bottom hole is 150mm up from the bottom to keep the roots out of the drain holes.
I'm not sure how the drain bit is going to go, because I have no idea how long the roots are going to be.
.
Aquaponics - Strawberry towers MK 237
I settled on settling on a method of building some strawberry towers. People make strawberry towers all the time, so how hard can it be?
I'm going to cut some 900 mm lengths of PVC, cap and tap the bottoms, and grow perfect strawberries for ever.
That's the plan.
And I have to be quick, because some Doctor guy from UniSA (a local university) is coming to take a peak at my little system next week, and while I was between grow houses, we had a bit of a storm here that saw all three of my tomato plants and most of everything other than my strawberries, had to have a bit of a lie down. One of my tomatoes decided to move permanently into the compost bin as a result of the inferior accommodation I was providing.
No hard feelings.
Most people make tall strawberry towers to maximise their grow space, they also make them double sided to maximise their growing space. ie they put strawberry plants on both sided of vertical tubes with strawberry plants. I don't know why people don't use all four sides of their circular tubes, but they don't.
Perhaps it's to prevent overcrowding.
Perhaps it's all about circle's not having sides.
Who know's.
I wont be doing it, I'll be doing something less efficient.
But at the same time, I'll be doing something that I hope will be less likely to leak around the holes. I'll be making semi-vertical strawberry towers.
So...
 As with most things I do, I started by drilling some holes in some PVC.
In this case, 90mm end caps.
These will form the base of my little strawberry towers, and the hole will allow the water I feed into the top, to drain back to the fish tank.
 You can clean the holes with anything sharpish, like the corner of a metal ruler if you have some kids you can set to the task, or whatever one of these things is called in your part of the world.
Try not to lose the integrity of the nice clean drill cut as it will help the seal if the clean cut made by the drill is left intact. Avoid sticking anything through the hole, and just trim the bur from each edge.
 I'm using clear plastic pipe to adapt my 90mm PVC pipe to my black polly pipe plumbing. I thought I'd go with this method again as it makes a pretty good seal.
I was talking to someone from my local hardware store, who mentioned that silicone doesn't stick very well to black poly pipe. I know this from my first attempts at solar hot water heating, but it's nice to have it confirmed.
I cat a diagonal to make it easy to force through the slightly smaller hole in the PVC end cap.
 And pull it through under quite a bit of force to make a decent seal. I cant tell you what size the drill bit was, or for that matter what size the pipe is.
I'm guessing the drill was 12mm, and the pipe is also 12mm outside diameter. So perhaps 10 internal diameter.
Either way it shouldn't really matter as this clear stuff stretches a lot if you soak it in hot water for a bit. You can add to the stretch by putting some closed long noes pliers into the tube, and them opening them when you soak it in hot water. With enough force, you can stretch it quite a bit. Dip in cold water to speed up the cooling time, and it will set in the stretched position.
 My plan is to try to get away with not gluing the end caps on, because as I'm lazy.
To this end, I cut the tube off at around 8cm long, and pulled the hose down so that, when the tower is standing, the pipe will be low enough to drain water out before the cap seal comes into question.
I hope.
 The outside side looks like this.
At this point, you should shine a torch into the inside side of the tube.
It looks really interesting.
 See.
See.
This photo doesn't do it justice, but was the best I could manage.
It's a very pleasing thing to look at in the real world.
If you have a fish tank with some of this tubing pumping air to them, cut some off a tiny bit, and have a look with a torch.
They wont miss it. Fish love science.
 So the plan is to make five of these caps and stick them onto some semi-upright tubes, full of holes full of strawberry plants. These will all drain into a gutter that drains into the fish tank.
That should work.
I'll be making 5 of these short strawberry towers to go on the southern side of my grow house.
I live in the southern hemisphere, so that's the side that won't block the sun in winter. I don't care how much sun I block in summer. We have plenty of the stuff in summer in Australia, and for that matter we have plenty of it in winter as well. Although saying anything general about Australia and weather in the same sentence is a bit pointless because this place is kind of big. Australia stretches from a few hundred kilometres away from the polar region to within a few hundred kilometres of the equator, so we see a fair range of climates. Mine in Adelaide, is Mediterranean in behaviour.
Which is nice.
[note from the future - a couple of the little strawberry towers leaked at the bottom around the unsealed end cap, but a thin smear of silicone from the outside fixed it.]
Aquaponics - Strawberry towers MK 237 and much much more at http://120thingsin20years.blogspot.com/
I'm going to cut some 900 mm lengths of PVC, cap and tap the bottoms, and grow perfect strawberries for ever.
That's the plan.
And I have to be quick, because some Doctor guy from UniSA (a local university) is coming to take a peak at my little system next week, and while I was between grow houses, we had a bit of a storm here that saw all three of my tomato plants and most of everything other than my strawberries, had to have a bit of a lie down. One of my tomatoes decided to move permanently into the compost bin as a result of the inferior accommodation I was providing.
No hard feelings.
Most people make tall strawberry towers to maximise their grow space, they also make them double sided to maximise their growing space. ie they put strawberry plants on both sided of vertical tubes with strawberry plants. I don't know why people don't use all four sides of their circular tubes, but they don't.
Perhaps it's to prevent overcrowding.
Perhaps it's all about circle's not having sides.
Who know's.
I wont be doing it, I'll be doing something less efficient.
But at the same time, I'll be doing something that I hope will be less likely to leak around the holes. I'll be making semi-vertical strawberry towers.
So...

In this case, 90mm end caps.
These will form the base of my little strawberry towers, and the hole will allow the water I feed into the top, to drain back to the fish tank.
 You can clean the holes with anything sharpish, like the corner of a metal ruler if you have some kids you can set to the task, or whatever one of these things is called in your part of the world.
Try not to lose the integrity of the nice clean drill cut as it will help the seal if the clean cut made by the drill is left intact. Avoid sticking anything through the hole, and just trim the bur from each edge.
I was talking to someone from my local hardware store, who mentioned that silicone doesn't stick very well to black poly pipe. I know this from my first attempts at solar hot water heating, but it's nice to have it confirmed.
I cat a diagonal to make it easy to force through the slightly smaller hole in the PVC end cap.

I'm guessing the drill was 12mm, and the pipe is also 12mm outside diameter. So perhaps 10 internal diameter.
Either way it shouldn't really matter as this clear stuff stretches a lot if you soak it in hot water for a bit. You can add to the stretch by putting some closed long noes pliers into the tube, and them opening them when you soak it in hot water. With enough force, you can stretch it quite a bit. Dip in cold water to speed up the cooling time, and it will set in the stretched position.

To this end, I cut the tube off at around 8cm long, and pulled the hose down so that, when the tower is standing, the pipe will be low enough to drain water out before the cap seal comes into question.
I hope.

At this point, you should shine a torch into the inside side of the tube.
It looks really interesting.

This photo doesn't do it justice, but was the best I could manage.
It's a very pleasing thing to look at in the real world.
If you have a fish tank with some of this tubing pumping air to them, cut some off a tiny bit, and have a look with a torch.
They wont miss it. Fish love science.
 So the plan is to make five of these caps and stick them onto some semi-upright tubes, full of holes full of strawberry plants. These will all drain into a gutter that drains into the fish tank.
That should work.
I'll be making 5 of these short strawberry towers to go on the southern side of my grow house.
I live in the southern hemisphere, so that's the side that won't block the sun in winter. I don't care how much sun I block in summer. We have plenty of the stuff in summer in Australia, and for that matter we have plenty of it in winter as well. Although saying anything general about Australia and weather in the same sentence is a bit pointless because this place is kind of big. Australia stretches from a few hundred kilometres away from the polar region to within a few hundred kilometres of the equator, so we see a fair range of climates. Mine in Adelaide, is Mediterranean in behaviour.
Which is nice.
[note from the future - a couple of the little strawberry towers leaked at the bottom around the unsealed end cap, but a thin smear of silicone from the outside fixed it.]
Aquaponics - Strawberry towers MK 237 and much much more at http://120thingsin20years.blogspot.com/
Aquaponics - My shiny new grow house
At long last I now have a finished grow house.
Finished in so far as its built.
 This one cost twice as much as the old one and is better in some ways and not so good in others.
It's disappointing in it's inability to keep some pests at bay because it doesn't seal as well around the base and door, so snails might find their way in. It feels a bit like you're performing some kind of mummy resurrection ritual when you walk around a grow bed three times, grinding a sea salt grinder challenging snails to do their worst.
It also has no shelves, but that's both good and bad.
I have a plan.
 On the good side of the equation, this one is built a lot better, and has two air vents. I'm hoping to control air flow with some electronics, so having vents will allow me to add a fan or hinged door or something, so I can move air when I want to, and close it up when I want to close it up.
I don't have a plan for that.
I also don't really have a plan for how I'm going to keep my new grow house from blowing away.
I'm using rope to attach it to the fish tank at the moment
Finished in so far as its built.

It's disappointing in it's inability to keep some pests at bay because it doesn't seal as well around the base and door, so snails might find their way in. It feels a bit like you're performing some kind of mummy resurrection ritual when you walk around a grow bed three times, grinding a sea salt grinder challenging snails to do their worst.
It also has no shelves, but that's both good and bad.
I have a plan.

I don't have a plan for that.
I also don't really have a plan for how I'm going to keep my new grow house from blowing away.
I'm using rope to attach it to the fish tank at the moment
Aquaponics - New Grow house
My old grow house fell apart too much, so I got the store I bought it from to replace it with almost all of a new grow house.
 My old grow house now looks like this.
Spacious isn't it.
It employs new green house gas technology rather than plastic.
In case you are new here, there really isn't a green house in that picture, and I'm making an hilarious reference to climate change.
 My new grow house looks like this.
See the missing bit?
Actually that's not the bit that's missing, but the bit I need to put the cover on is missing.
I did get one too many of a different bit. That should at least give me a bargaining chip at the returns counter.
If I'm lucky I'll bump into the person returning my missing bit and complaining about their lack of my extra bit.
Hopefully it will turn out to be the people next door, and we can sort the entire mess out at our letterboxes as we each load our grow houses into our cars.
Yep, I'm pretty sure that's what will happen. Everything will be fine in the morning.

Spacious isn't it.
It employs new green house gas technology rather than plastic.
In case you are new here, there really isn't a green house in that picture, and I'm making an hilarious reference to climate change.

See the missing bit?
Actually that's not the bit that's missing, but the bit I need to put the cover on is missing.
I did get one too many of a different bit. That should at least give me a bargaining chip at the returns counter.
If I'm lucky I'll bump into the person returning my missing bit and complaining about their lack of my extra bit.
Hopefully it will turn out to be the people next door, and we can sort the entire mess out at our letterboxes as we each load our grow houses into our cars.
Yep, I'm pretty sure that's what will happen. Everything will be fine in the morning.
Electronics - Transistors
Transistors have to be one of the all time great inventions. Right up there with the sharpened stick, fire, deodorant on public transport, and the wheel.
Transistors are in just about everything electronic. They are what makes all that cool stuff like your computer work. They do it all day long, and there are sqillions of them.
That's pretty much all you need to know about them, but I'm going to tell you more anyway. Which is a little surprising because I don't really know a lot about them yet, but what I do know has opened some doors to a slightly better understanding of what's possible with this electronics stuff.
I made a program in my little chip that controls the speed of a little motor. The motor, and the chip were both powered by the chips power supply, but the chip cant control the motor directly. If you plugged the motor directly onto the chips pin, it would suck too much power though the chip and burn it out.
I actually did that, but oddly it was while I was trying to do the very thing that avoids putting all that power through the chip.
 What I was doing was using a transistor.
This is the device here. The chip is on the board with all the short white wires on it. That plugs into the breadboard (white thing with holes for wires)
A transistor comes in various guises. The one I'm playing with is a small electronic component with three legs.
That small black thing on the right of the bread board is the transistor.
The other things in that picture of note are the motor on the left, and the two battery packs. One under the breadboard powering the chip, and the other at the bottom of the picture with two visible batteries. There should be four batteries in that pack, but I needed two of them to run my camera.
Doing 120 things in 20 years is teaching me new things all the time. Today I learnt that it's very difficult to take a photo of your camera's batteries.
The reason there are two battery packs, is because I'm powering my control circuit (the bit with the chip in it) with one of them, and I'm pretending the other is a 12 volt car battery. It isn't, but I have a good imagination.
The reason I'm pretending is because I want to learn how to power my motor from the battery (12 volt 200 amp hour deep cycle (great big (like a car battery but bigger))) I use in my aquaponics system as a back up power supply to keep the pumps working in case of a power outage.
I turns out if you apply a small voltage to a transistor's centre pin, and then pass a large voltage through the other two pins, you can use a transistor as a switch. Not so surprising really because that's what a transistor is. The small voltage to the centre pin allows a large voltage through the other pins.
Stop the small voltage and you stop the large voltage. Start the small voltage, and you start the large voltage.
Very clever, and very, very useful.
It's an amplifier.
It's also a digital switch.
I'm guessing it's some other stuff as well.
So far, transistors are my favourite component, except perhaps for chips. But I think chips are full of transistors, so they don't really count. In fact I think they're full of all kinds of stuff. Their real name is "Integrated circuits" or "IC's". I'm guessing there's a stack of stuff integrated into them.
Transistors are in just about everything electronic. They are what makes all that cool stuff like your computer work. They do it all day long, and there are sqillions of them.
That's pretty much all you need to know about them, but I'm going to tell you more anyway. Which is a little surprising because I don't really know a lot about them yet, but what I do know has opened some doors to a slightly better understanding of what's possible with this electronics stuff.
I made a program in my little chip that controls the speed of a little motor. The motor, and the chip were both powered by the chips power supply, but the chip cant control the motor directly. If you plugged the motor directly onto the chips pin, it would suck too much power though the chip and burn it out.
I actually did that, but oddly it was while I was trying to do the very thing that avoids putting all that power through the chip.
This is the device here. The chip is on the board with all the short white wires on it. That plugs into the breadboard (white thing with holes for wires)
A transistor comes in various guises. The one I'm playing with is a small electronic component with three legs.
That small black thing on the right of the bread board is the transistor.
The other things in that picture of note are the motor on the left, and the two battery packs. One under the breadboard powering the chip, and the other at the bottom of the picture with two visible batteries. There should be four batteries in that pack, but I needed two of them to run my camera.
Doing 120 things in 20 years is teaching me new things all the time. Today I learnt that it's very difficult to take a photo of your camera's batteries.
The reason there are two battery packs, is because I'm powering my control circuit (the bit with the chip in it) with one of them, and I'm pretending the other is a 12 volt car battery. It isn't, but I have a good imagination.
The reason I'm pretending is because I want to learn how to power my motor from the battery (12 volt 200 amp hour deep cycle (great big (like a car battery but bigger))) I use in my aquaponics system as a back up power supply to keep the pumps working in case of a power outage.
I turns out if you apply a small voltage to a transistor's centre pin, and then pass a large voltage through the other two pins, you can use a transistor as a switch. Not so surprising really because that's what a transistor is. The small voltage to the centre pin allows a large voltage through the other pins.
Stop the small voltage and you stop the large voltage. Start the small voltage, and you start the large voltage.
Very clever, and very, very useful.
It's an amplifier.
It's also a digital switch.
I'm guessing it's some other stuff as well.
So far, transistors are my favourite component, except perhaps for chips. But I think chips are full of transistors, so they don't really count. In fact I think they're full of all kinds of stuff. Their real name is "Integrated circuits" or "IC's". I'm guessing there's a stack of stuff integrated into them.
Electronics - Social norms and fried chips
I'm of the opinion that kitchens should have two computers sitting side by side on a small kitchen table, a soldering station, and stack of components strewn everywhere, an electronics project in the works, and perhaps a few, as yet unidentified, insects in jars.
 Interestingly I'm discovering it's not necessarily everyone's idea of the perfect kitchen.
 But I bought some of these to add to the kitchen today.
They look neat.
I figure if I add neatness, the overall average neatness score has to increase. Thus, I have slightly improved the situation.
That should buy me some time before having to create some kind of work space that isn't also a dining table.
As much as I feel my neatness score is on the improve, and if I keep adding neat stuff to the collection, I'll end up having a kitchen that must generally be considered to be over all "more neat than not", it's probably a good idea to start this kind of stuff somewhere else.
 Those neat things I bought do this.
 Which I think is an improvement on this.
I've been struggling a bit to work out some electronics stuff that should have been easy, and I even fried a chip.
It's a commonly held belief that electronic components are full of magic black smoke, and once it's let out, can never be returned.
This, to my surprise, turned out to be true.
I like to blame my escaping black smoke on the birds nest of wires I made my test circuits from. Some stuff simply doesn't like having its wires crossed.
At least with my new connectors, there will be one less thing to blame burnt out components on.


They look neat.
I figure if I add neatness, the overall average neatness score has to increase. Thus, I have slightly improved the situation.
That should buy me some time before having to create some kind of work space that isn't also a dining table.
As much as I feel my neatness score is on the improve, and if I keep adding neat stuff to the collection, I'll end up having a kitchen that must generally be considered to be over all "more neat than not", it's probably a good idea to start this kind of stuff somewhere else.


I've been struggling a bit to work out some electronics stuff that should have been easy, and I even fried a chip.
It's a commonly held belief that electronic components are full of magic black smoke, and once it's let out, can never be returned.
This, to my surprise, turned out to be true.
I like to blame my escaping black smoke on the birds nest of wires I made my test circuits from. Some stuff simply doesn't like having its wires crossed.
At least with my new connectors, there will be one less thing to blame burnt out components on.
Electronics - Soldering helper
Just as people named Bill turn out to be excellent at welding, it turns out people named Pete turn out to be excellent at helping you with soldering.
 I recommend finding someone named Pete to help you with soldering if you can. If you do go looking for a Pete, try to get one that makes you one of these.
It's a clamp.
But not just any clamp.
It's a clamp for holding circuit boards.
 You clamp in your board...
place your components in...
bend the legs a little to hold them in place...
 Then flip the board over to solder them in place.
The most amazingly useful bit of ongoing help anyone could provide.
Thanks people named Pete, wherever you are.

It's a clamp.
But not just any clamp.
It's a clamp for holding circuit boards.

place your components in...
bend the legs a little to hold them in place...

The most amazingly useful bit of ongoing help anyone could provide.
Thanks people named Pete, wherever you are.
Aquaponics - Friend or foe
I'm constantly faced with a dilemma. What to do with the bugs I meet, either within my system, or knocking at the door.
My current policy is to let everyone in except caterpillars, snails, and slugs. What ever they are if I see them, I put them into my growhouse, or at the very least let them stay.
 It can get a little tricky when you meet someone like this, and have no idea if the next day, your garden will be totally destroyed, but it keeps things interesting.
I actually think this fellow might be a lacewing larva.
That could be a good thing because I think the grown up version eats aphids.
This policy of mine may well end in disaster, but so far everything seems to be holding to some kind of balance.
In the first few weeks I was nearly over run by aphids. I figured this was because I was basically practising mono-culture in my bug population. The aphids were in plague. Now there is a stack of assorted beasties, and everything seems to have settled down.
The problem with getting rid of the aphids might be that there is nothing left for the predators to eat. I have a feeling, that having a bit of everything might be a better way.
Except caterpillars, snails, and slugs.
I hate caterpillars, snails, and slugs.
They eat too much, and without a mega species like birds, I feel I need to be the caterpillar, snail, and slug predator.
I should get a bird.
My current policy is to let everyone in except caterpillars, snails, and slugs. What ever they are if I see them, I put them into my growhouse, or at the very least let them stay.

I actually think this fellow might be a lacewing larva.
That could be a good thing because I think the grown up version eats aphids.
This policy of mine may well end in disaster, but so far everything seems to be holding to some kind of balance.
In the first few weeks I was nearly over run by aphids. I figured this was because I was basically practising mono-culture in my bug population. The aphids were in plague. Now there is a stack of assorted beasties, and everything seems to have settled down.
The problem with getting rid of the aphids might be that there is nothing left for the predators to eat. I have a feeling, that having a bit of everything might be a better way.
Except caterpillars, snails, and slugs.
I hate caterpillars, snails, and slugs.
They eat too much, and without a mega species like birds, I feel I need to be the caterpillar, snail, and slug predator.
I should get a bird.
Aquaponics - Grow house FAIL
My grow house broke.
 The seam near the zip has given way.
The stitching was done right on the edge rather than a few millimetres in.
Luckily I bought it from a decent hardware store, so I doubt there will be any issue exchanging it.
It's a pity, because I have a stuck of stuff attached to it now.
Lots of plumbing is all wired on or strapped up with cable ties.
Sad.
Electronics - introduction to PICAXE - 08M
"So what so exciting about a programmable microchip?" I hear you ask.
"Lots.", I hear me reply. And I've just had a tiny glimpse of what they can do.
This is a rough outline of how they do what the do so well.
 You buy this little bit of plastic with some pins sticking out of it. This one costs around $2. It's a little computer that can read stuff connected to it, and respond to the outside world by manipulating stuff connected to it. Inputs and outputs.
It's surprisingly powerful. In fact is has the same processing speed as my first computer.
I never looked in side my first computer, but I doubt that this was all there was inside.
 My little chip has 8 pins.
Each of them does interesting stuff.
 The top two pins are to connect your power lines.
One + 4.5 volts, and one - 0 volts.
Useful force can be applied to a problem, because of the difference in these two voltages. A rock sitting on top of a hill is stored force, because there is a downhill. If there were only uphill, or only downhill, you'd just have regular powerless rocks. But combine an uphill with a rock on it, with a down hill, and we have some potential energy.
So useful force exists because we can tap into the difference between these two voltages.
 The next two pins are so your chip can chat with a computer like the one you are sitting in front of now.
I dont know how that stuff works except to say a cable goes from these pins to a computer, and as a result you can successfully store instructions on the little chip.
You can also see some stuff on your computer screen so you can tell what's going on in there.
But more about that later.
 The bottom four pins are the interesting bit. They allow inputs and outputs.
Within this chip they can be referred to by your instructions as C.1, C.2, C.3, and C.4.
What this allows you to do is write a program that controls the temperature in a grow house with something like this...
That's not a real program or anything, that's just the kind of thing you might ask of one.
I wish that was real programming. Then I'd be an expert, because that's just my thoughts on any regular day.
I count a lot of sheep.
But you can also do a lot more than that. For instance just on the subject of keeping your grow house temperature sane, you could take a temperature inside and out, compare them, decide which is the better temperature, and run the fan only if its an advantage to do so. After all, if it was hotter outside than in, and you blew your too hot air out, it would be replaced with even hotter air from outside. Perhaps you could choose to draw in air from somewhere cooler.
I can think of a dozen different things I could control in the grow house alone.
The really cool thing, is there are a stack of incredibly inexpensive components that you can buy, that are light sensitive, sound sensitive, distance, moisture, GPS, touch, vibration....everything you can think of. And they can all be attached to a pin, have some decisions made, then those decisions can control things like lights, motors, switches, locks, pumps, robot arms, clocks, electric toothbrushes, toys, lawn mowers, and everything else you didn't think of in that first bit, where I got you to think of everything.
"Lots.", I hear me reply. And I've just had a tiny glimpse of what they can do.
This is a rough outline of how they do what the do so well.

It's surprisingly powerful. In fact is has the same processing speed as my first computer.
I never looked in side my first computer, but I doubt that this was all there was inside.

Each of them does interesting stuff.

One + 4.5 volts, and one - 0 volts.
Useful force can be applied to a problem, because of the difference in these two voltages. A rock sitting on top of a hill is stored force, because there is a downhill. If there were only uphill, or only downhill, you'd just have regular powerless rocks. But combine an uphill with a rock on it, with a down hill, and we have some potential energy.
So useful force exists because we can tap into the difference between these two voltages.

I dont know how that stuff works except to say a cable goes from these pins to a computer, and as a result you can successfully store instructions on the little chip.
You can also see some stuff on your computer screen so you can tell what's going on in there.
But more about that later.

Within this chip they can be referred to by your instructions as C.1, C.2, C.3, and C.4.
What this allows you to do is write a program that controls the temperature in a grow house with something like this...
Start
Check the temperature from a thermometer connected to pin C.1
if its too hot, turn on a switch (connected to a vent fan) connected to pin C.2 otherwise don't worry about it
wait a few minutes and count sheep for a bit
go back to the start and recheck over and over again for ever, in case the weather has changed
That's not a real program or anything, that's just the kind of thing you might ask of one.
I wish that was real programming. Then I'd be an expert, because that's just my thoughts on any regular day.
I count a lot of sheep.
But you can also do a lot more than that. For instance just on the subject of keeping your grow house temperature sane, you could take a temperature inside and out, compare them, decide which is the better temperature, and run the fan only if its an advantage to do so. After all, if it was hotter outside than in, and you blew your too hot air out, it would be replaced with even hotter air from outside. Perhaps you could choose to draw in air from somewhere cooler.
I can think of a dozen different things I could control in the grow house alone.
The really cool thing, is there are a stack of incredibly inexpensive components that you can buy, that are light sensitive, sound sensitive, distance, moisture, GPS, touch, vibration....everything you can think of. And they can all be attached to a pin, have some decisions made, then those decisions can control things like lights, motors, switches, locks, pumps, robot arms, clocks, electric toothbrushes, toys, lawn mowers, and everything else you didn't think of in that first bit, where I got you to think of everything.
Subscribe to:
Posts (Atom)
Popular Posts
-
 You see CHIFT PIST a lot in the aquaponics forums and it means "constant height in fish tank, pump in sump tank". And its a very g...
 -
 The bell siphon was a clever thing for someone to design, and as such you feel a bit of that "clever" rub off onto you when you m...
 -
 A "bell siphon" is a device that automates the flooding and draining of an aquaponics grow bed, even though the pump is adding wa...
 -
 Apparently, marron come in two varieties. Hairy and not so hairy. Cherax cainii (smooth) and Cherax tenuimanus, or Margret River marron (hai...
 -
 A while ago I tried to make a fish fed fish feeder design that would allow the fish to feed themselves. I think It's made. I say ...
 -
 Painting lures is easier if you don't know how. I don't, so I'm already well on my way. I started by owning a printer. That ...
 -
 If you pump air down into a submerged tube, when the bubbles rise to the surface, by virtue of the fact that they take up some space, they c...
 -
 The good thing about growing things like potatoes in aquaponics is they grow like crazy. The problem with growing things like potatoes in ...
 -
 Wire is one of the greats. It's power lies in its ability to be made shorter and apply great tension, with the application of many small...
 -
 With a little practice its possible to make a screw. If you bend your wire into an eyelet, its possible to make a screw in eyelet. The use...