Showing posts with label Fire. Show all posts

Fire - Tin can stove success

I decided to make another tin can stove with the new design, but this time I thought I'd make it work.

A major design flaw of the first attempt was not actually the bit where the tin ripped in two, but was actually the bit where I was thinking upside down.

The previous version had grooves that would only reach the bottom.

That was never going to work.


This time I made the grooves in such a way as they would still be grooves when they reached the top.

Much more likely.

So, the top (open ended) half of the can is bent like this, and made to sit into the bottom (still with the base on) of the can.


All up this process takes only 5 minutes or less.

The zig-zag bit is placed zig-zag down into the half on the left.

It doesn't even need to be a snug fit.

Just drop it in place.


The result is, that when you light the alcohol and wait a few seconds for the device to heat up, it vaporizes the spirit within the zigs and the zags of the two walls created by the can halves, and is emitted as gaseous fuel through the top of the (now inverted) zig-zag bits.

Like this.

Perfect!

And quick.

A quicker, more durable ethanol stove.

A total success.


Much better than the last attempt.

Thanks to whoever first thought of this method of making a little spirit stove, that enable the happy camper to knock out a stove within a few minutes of dumping a can's contents into a pot.

Now all I need is canned food that actually tastes good.

And perhaps the ability to make a tin can.

I have no idea how to make a tin can.

But I'm not going to make a can as a "Thing" because nothing good ever came out of a can.


120 Things in 20 years - No can was hurt in the making of this post.


And sweetened condensed milk comes in a can, and that stuff is delicious.

But I still don't want to learn how to make a can.


Fire - Quicker, more durable ethanol stove

A while back I made a pretty convincing ethanol camp stove out of a coke can.

It worked well and looked like this when it was running.

I've used it a bit since then and it's definitely a practical addition to any backpack.

The problem is it's starting to show signs of aging. The can expands and contracts, and there is now a crease where extra gas flows giving an uneven flame.


In my model (also not my design) I used an inner sleeve with holes at the top to let the gas out. The result is that the trapped ethanol (spirit/alcohol/methanol) between the outside wall, and the inner wall boils the spirit, and creates a gas jet that looks a lot like a normal BBQ burner.

One of the problems was trying to get the top of a coke can to fit into the bottom of a coke can. It's tricky because (of course) they are the same size. It can be done, but involves gently stretching the outside one and it takes a lot of messing about.

Now I'm being pretty fussy here. The little burner works really well, but it did tend to leak fuel around creases that formed in the join between the top and the bottom sections.

Someone on a Stirling engine forum pointed me towards a different method of making one. This method involves no holes, but it just encourages those creases that mine developed by itself, and I think it might be a winner.

Their's also used a drink can, but I think it might make a more robust version if I used a tinned food can.

So, to start with, I peeled a normal, every day food tin.


The first step was to trim it to size.

I needed the top to fit into the bottom, so the first thing to do was punch a hole in it to enable a cutting tool to get in there.

I used that mystery tool that pocket knives have.

Probably a leather working tool or something.

Who knows, just punch a hole in the can.


Next jam in some tin snips or something to make a nice cut to separate top from bottom.

My tin snips are stupid, so I ended up using scissors.

This isn't the best way to use scissors, so don't do this at home unless you actually own the scissors.


One very good method of cutting a tin can, is to just tear it by grabbing a ragged tail of tin with a pair of pliers and twist. If there's a groove to follow, it actually makes a pretty straight cut.


As I said, I ended up using scissors to trip everything to it was nice and neat.

I made the inside sleeve (the one on the left), slightly taller than the other so the pot could sit on the rim and let the gas escape from the gap between the outside sleeve.


I bent a series of grooves in the base of the inner sleeve so that they would allow the flow of gas, and also allow the inside sleeve to fit inside the outside sleeve.

This was simply a case of grasping with pliers, and twisting them to the left, and slightly down toward the centre.


Next I inverted the inside sleeve and carefully positioned the outside sleeve over it so that I might press the two together by stamping down with my foot.


Which failed completely.

Making smoked foods - Tin can smoker

As far as I can tell, everything worth eating, is worth smoke curing.


As a result of a gift from my other mother, we have one of these in our yard.

Shiny!

And poorly photographed!

"Poorly photographed", is a new style I'm exploring a bit in this post.


A gas BBQ is all well and good, but as part of the move to gas, we tend to miss out a bit on the flavours that woodsmoke can provide.

Gas = good

Wood = good

Gas AND woodsmoke = amazing!

An extremely important part of this "Thing" is the humble tin can. I say humble, but I'm not really sure if a tin can actually does humble.

I'm guessing a tin can mostly does tin can things.

Lurking springs to mind.

Shinning might also rate a mention if it's a fresh one.

Mine's a fresh one.


Shine can, shine.

Lurk can, lurk.

A tin can can also have holes punched through it with an old mini-screwdriver, but I'll get to that a bit later.

For now, I'll introduce the backbone and or possibly un-necessary briquette.

Backbone, because it provides the heat that drives the smoke.

Un-necessary, because it might not.

I cant really tell what contribution this stuff made, other than it was used, and the result was good.

I also don't know enough to endorse any product you might see in this post, so take everything I say as you always should, with a grain of bacon salt.


Now is probably a good time to say that none of this stuff is my idea or anything (except perhaps using a screwdriver as a drill, and then enlarging those screwdriver holes with a bigger, thicker screwdriver ) but rather, it's a collage of everything I've read over the last few days, and the implementation is based on trial and error in real time, bizarre ritual, and risking tonight's meal.

DO try this at home. (except maybe the bit about ramming a screwdriver through a can of burning coal)

Anyway...

The briquettes look like this up close.

They look like brown coal, but I suspect they are made of more recent trees. Checking...

Ok... well it seems the packaging reads "Not suitable for barbecues. Probably something I should have read before buying it. Perhaps it shouldn't have been displayed in the BBQ section of the hardware I bought them from.

You live and learn.


I hope this isn't what made today's smoking such a success.

I have no idea what's in these things, so please don't use them unless you find out, and then please tell me what they are made off so I can seek whatever medical attention I might need.

I'm sure I'll be walrus.

Anyway...

other things to show and tell, include hickory chips.

I ended up using around two cups for my two chicken thighs, but I'm guessing it would make no difference how much stuff I put in the BBQ. It would still take around two cups.

Two chicken thighs in a BBQ is a total waste of energy, but I didn't want to waste too much food if it all went wrong.


I also bought some fire starter cube things to get the briquettes that are unsuitable for BBQs alight.

I have no idea what these things are made of.


If I ran an unscrupulous country that wanted to get rid of it's toxic waste, I'd just shape it into things and export it as products.

Outdoor furniture and so forth.

So, I smacked a few holes in my tin can with a rusty old mini-screwdriver thing.

I knew it was sharp enough for this task, because every other time I use it for a task it wasn't designed for, I manage to gain a body piercing of a part of my hand that was never designed to receive such a thing.

This time I hurt nothing but the can, because it turns out cans are pretty thin.

Confident stabs make smaller dents in the can, and cleaner holes.

Stab confidently.


I punched two extra holes at the top to thread a loop of wire through to act as a handle.

Probably not required, but I did use it at the end of the day to pick it up and put it under a water tap to make sure any leftover fire was safely out.

So... add a handle if you have a handy coat hanger or length of wire.

Pliers also work as a handle.


It took way too long to get the briquettes going because there was clearly not enough oxygen getting to them.

The flames were there, but they started at the top where they met fresh air rather than at the fuel where a fire should be.


So I "extra safely" punched a few more holes through, then made them bigger with a thicker screwdriver.

It turns out it's probably not a good idea to do this when it's burning, but it worked out fine in the end.


The fire took on a much more healthy glow, and I held back on adding too many holes to the lid, because I figured I might need to damp the fire down a bit because I want smoke not flame.

You cant really see it in the pic, but the flame actually looked like it was coming in through the holes at the bottom. Like an inside out gas burner. Like the fuel was gasing, and the flames did what they did to seek the oxygen.

Interesting. And a pretty handy tin can stove.


To be honest, I don't really understand why this was burning like I wanted it to when I wanted to get it alight, but then settled down to what I wanted it to do when I wanted smoke.

All the photos above include flame from the fire starter things, so perhaps it's just a case of them burning with a bit more gusto than the heat beads and wood chips.

Or it could be the water soaking of the wood chips.

Did I mention that? The wood chips were soaked in water boiling water for a few minutes before being added to the tin can with the glowing briquettes.

I suspect they dry out before they start to smoke, so perhaps it's just to stage the wood chips so they don't all go up in flames at the same time. As far as I can tell, it should be possible to either make them burn in stages by wetting them, creating only a small section at any one time that's dry enough and hot enough to start smoking, OR restrict the airflow and choke them to whatever combustion rate you want.

Perhaps the water soaking has some other reason. I'll let you know if it turns out to be important.

Smoke!

Lots of it.

I didn't push the number of holes, because I didn't want it to go to flame, but I got the feeling I could have made as much smoke as I wanted simply by adding more.


There was quite a bit of slack space between it burning , and it smoking. If I put out the fire, it would take a lot of blowing at the holes around the bottom to get it to flame again. (I only did this to test how forgiving it was) The result was that it seemed to prefer to make smoke rather than fire unless it was really coaxed into flame, and even then it settled back to making smoke.

Clearly it knew it's designated task.

I'll play a bit more later, and there's always the lid to damp it down if needs be.  I might even add a second lid so I can turn it like a tap to adjust it. ie, a big hole in each lid, and overlap them so you can change the size of the hole.

I was concentrating on air in, but controlling air (or exhaust) out does the same thing. It probably doesn't matter which one you control, the result is, if you restrict the airflow over the coals, you restrict the burn, and control the smoke.

After an hour or so of smoke that was sometimes on and sometimes off, depending on what I was trying at the time, the result looked like this.

To be honest, I was a little disappointed.

I thought it would have a lot more smoke colour to it. Some of that colour on the bacon was there in the beginning. And this photo is actually a little flattering as far as colour goes.


But it was getting late so I lit the BBQ and brought the bacon wrapped, blue cheese, and tomato stuffed chicken thigh parcels (my best tying effort to date in my own opinion) up to an internal temperature of 75c.

Apparently I missed a step called brining. I'll let you know if it turns out to have been important. I think it involves marinating your food in a salt water solution before smoking like I had to do with the home made cheese "thing".

But the result was truly amazing!

Totally worthwhile.

My big fear is that this will be one of those beginners luck things, and that I will now spend the rest of my life trying to duplicate it.

Hopefully, and perhaps more likely, is that this is just the beginning of what is possible with smoking.

I hope so.

The result makes for a terrible photo, because for some reason, I went for an autopsy/science  look rather than a food look.

Never take a food cross section photo straight on.

Originally I was a bit suspicious of the pink, thinking it might be under cooked, but my digital meat thermometer said it was cooked, and it turned out the thermometer knows it's stuff.


The chicken looked a bit like good bacon.

The bacon wrapped around the chicken looked like what I now call good chicken.

If anything it was actually a little over-done, but the brining step might add a bit of moisture to the final product that might counteract that.

Who knows. I cant wait to find out.

The only thing to do is learn a bit more, and do it again.

I rate this experiment with a tin can smoker a total success, and if you've ever thought about smoke curing stuff, I thoroughly recommend giving it a go.

Insanely delicious.

I hope the in(common)-laws don't read this and want their BBQ back.


120 Things in 20 years - Smoke cured stuff really rocks, and you can knock up a tin can smoker in only a few minutes.

Fire - Potato cooker mould

I guess it was bound to happen sooner or later, but my methanol potato cooker has gone mouldy.

That happens to a lot of the truly great inventions.

I think.

Wasn't it Edison that said "Sometimes a perfectly good invention fails only because the potato always goes mouldy."?

I could be wrong.

I never took history.


Fire - Home made ethanol stove

In a previous attempt to make a ethanol stove I ended up using a potato instead of the bottom the coke can I was working on, and you can see a lot of the build in the post called Fire - Ethanol potato cooker. Because I've already covered most of the build in that post I wont be repeating it here, so read that potato cooker post first.


Sorry for the terrible photo. it hurts my eyes as I try to force it into focus. Hopefully that's just something about me, and it wont actually hurt anyone else.

After some more research I thought I'd try making a proper drink can burner. This time I spent a lot more time on slowly scribing the line with a blade to get the cuts nice and clean. Rather than putting on a lot of pressure, I pressed gently, and rotated the can under the blade holding the blade in my right hand and the can in the other. Eventually a few small holes appear in the line, and at this time you can either cut it with a little more pressure, or just press it out (I used a pen because I wasn't sure how sharp it would be, but it wasn't all that sharp).

The end result was a very neat, clean cut that needed only a light sanding.

Actually it didn't really need a light sanding at all, but I did it anyway.


I also employed the method of putting a blade in a book. This time I clamped it down with a G-clamp, and pressed the top (really the bottom) of the can down with one finger while I rotated the can with my free hand.


I used the blade and book to mark a line for the base.

But the second cut of the can required scissors as there was no "top" of the can to press down with one finger.


But scissors cut it very cleanly.


So here are the three finished sections.

The one on the left is the top with all the holes punched through with a drawing pin

Centre is the inner sleeve cut out of the middle section of the can. (see previous post)

And the bottom is on the right.


The bottom bit was stretched* by pushing a full, un-opened can into it a wriggling it around for a bit.

It's difficult to describe the motion, but if you jam it in the move it around like a ball and socket joint (like your shoulder) the lip of the can is eventually stretched. It's very easy to get off the can as there is a perfect seal, and the air pressure inside pushes the small section off.

Put your base on something flat.

Press in a full can.

Wang it about a bit**.

Success!

Now, with the inner sleeve roughly in place, you can slide the top and bottom parts together. As long as you make them meet as close to evenly as you can (ie not one side first) it will fit.

I made my base section the outside, but I'm not sure if there is an advantage either way.

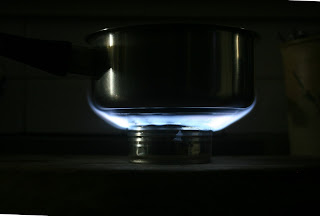
It looks like this when it's lit.


And this when it's not.


120 Things in 20 years was  overheard to say "On the subject of fire and home made ethanol stoves,   I personally didn't have any blood fall out, but I would say that although this is a great project to do with kids,  if you like them I'd make sure there was an adult around to stitch them back up, and put the fires out".


* Thanks for the tip Jabro

** If only someone would come up with a way to rapidly display pictures one after the other to give the reader the illusion of a "moving picture".


Fire - Ethanol potato cooker

I was thinking about my Murray River epic adventure, and thought I might need a small emergency stove for when I find myself in a storm, or otherwise unable to make a fire. The difference between being miserable and content often boils down to a hot meal.

So I thought I'd make a ethanol stove. There are a few on the market, and they work by boiling the ethanol within a small chamber with holes around the top. The ethanol turns to a gas, exits at the holes, and burns like a nice gas stove. Lots of heat, light weight, and perfect for what I need.

There are quite a few examples of home made versions on the net, so after quite a bit of research, I thought I'd have a go.

I failed.

I found it impossible to squeeze two halves of a drink can that were the same diameter over each other.

Stupid physics.

So I thought I'd convert my failed project into a potato cooker.

It looked a little something like this...

I started with a can.


I poked some holes around the near top of it with a drawing pin.


I cut the top off with a box knife.

The best way to do this is to lightly score it, round and around, until you gently wear through.

I didn't do that, and I nearly cut all my fingers off one after the other in a series of ever more lucky near misadventures.

Lucky.


To cut the next bit, I originally set the can upright with the blade held at the correct height by placing it in page 321 of Stephen Hawking's book "God created the integers" which was exciting, because I finally found a use for it.

It didn't work as well as youtube told me it would.

Neither did the box knife without Steven Hawkings' help.


Eventually I used scissors. 

This pic is me cutting the planed base that the top was meant to firmly slide over.

I threw that bit away in the end, and used a potato instead.


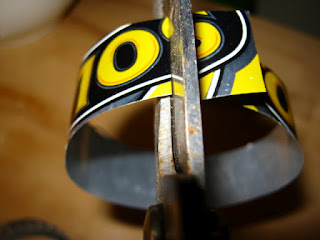
I cut a strip from the can, and made a cut first half way through one end, and then half way through the other side of the other end.


Then used the opposing slots to make this inner sleeve.


I also cut a little v in it to allow the flow of fuel.


I sat the inner sleeve inside the outer, top bit with the holes in it.


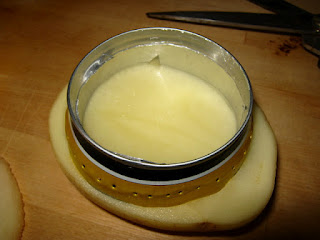
I sliced a potato top and bottom to make a nice stable base, rested it over the top, and gently pressed it down onto the device until it was firmly stuck in place.


It looked like this and appeared to make a pretty good seal.


I added fuel up to the holes, and lit it.


At first the inner section burns and heats up the fuel between the sleeve and the outer section.

At this stage you just leave it alone for a few seconds until it warms up.


Quite suddenly and with a pleasant pop reminiscent of lighting a gas stove, the fuel turns to steam and the burner ignites at the holes.

Total surprise. 

The thing actually works. 


I quickly found a pot, and put one metric cup (250ml) of cold tap water on the heat.

As soon as you do this it snuffs the centre section, but because the holes are down a bit from the top, they continue on perfectly. 


I had a proper boil at around 5 minutes, and a slight simmer at just shy of four minutes.


Much better than I expected. This was a total success.

The entire project from the time I looked at the soft drink can to the time I could make a cup of tea was around an hour and a half, but most of that was attempting to make it without the potato. I think I could knock one of these up and have water boiled in 10 minutes with nothing but a drawing pin and pair of scissors.

Way cool. Thanks to everyone on the net that did stuff like this and gave me all your tips. My only contribution was the potato.


120 Things in 20 years - Ethanol stove - Potato cooker. Boiling water! Yum!


Popular Posts