Showing posts with label seeds. Show all posts

Aquaponics - Seed raising in sphagnum moss

Anyone looking for a nice clean medium to sprout seeds for aquaponics should have a look at sphagnum moss. The seedlings come out with out any damage to roots, and perfectly clean.

You can even place a wad directly into your system and put the seeds into it. Then either leave the moss in place for ever (it doesn't rot, but springs back into life, even though you buy it dry and dead).

You could also just pick it out once the plant had become established.

Here are radishes, and some kind of leek or something growing on my kitchen window sill.


120 Things in 20 years grew something!

Aquaponics - Strawberry propagation

I found a new way to propagate strawberries. Or at least it's new to me. The secret is to have the seeds sprout while it's still on the fruit.

Although I would have liked to leave it alone to see if they would all grow by themselves, the fruit is almost rotten so I thought it would be better to pick it and plant them all.

It came from a dirt garden so there was a lot of risk of it being eaten by things before they had a chance to grow.

I planted it into my aquaponics system.


From what I could see, all the seeds had sprouted.

I have no idea what conditions were required to make it happen or if they will actually end up growing, but the original plant was a modern lab created thing that didn't produce runners. Or almost didn't. From around 60 plants I think I've seen two runners in two years.

120ThingsIn20Years thinks the world is odd.


Aquaponics - PVC Tube tomato

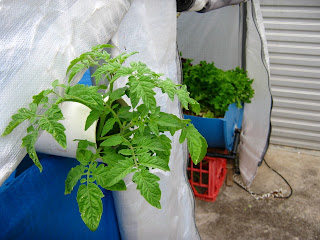
My PVC tube tomato seems to have found it's feet.

It took a while after I removed all but four or so leaves on each of the four plants that make up this particular experiment.

 It's probably back to around what it looked like four weeks ago.

By my standards, that actually constitutes success.


On a side note, the foliage in the background is the grow bed that I emptied and flooded around five weeks ago (flooded to get any slugs out).

That's lettuce you can see, and we've been cutting a salad a day from just that right hand side. The left hand side was Bok Choy, but that all went to seed, and has since been fed to my worms.

When I put the seedlings in (bought from a shop) I also sprinkled some mixed lettuce seeds around.


It looks like this five weeks later.

We've been harvesting from the front, and you can see some of the seedlings from the seeds are looking a little weak because they have been struggling for light, but now they have some, they will spring to life.


In summer, and harvesting a light lunch size salad each day, (in Adelaide South Australia at least) we found you need around half a blue barrel worth of growbed real estate, as long as you seed every week.

I like coz lettuce because it can be harvested as it grows (ie just cutting off leaves rather than pulling up the plant) , but these loose leaf varieties are proving to be quick growing, and can also be repeat harvested. if you drop seeds in around the seedlings when the seedlings are around the size you buy them at, the seeds are seedlings when the lettuce has been repeat harvested as much as it can, and finally gets pulled out.  I just read that again, and I think all that means something. 

The leaves get bitter toward the end of the lettuce life cycle as they are about to go to seed. The leaves  also grow further apart. So once they start growing from a stalk rather than from a central point at the base, it's time to pull the plant up, and let the light in to the little ones, that are by this time the size of the store bought seedlings.

I don't think I've ever grown the iceberg style lettuce that grows like a cabbage, so I don't know if you can repeat harvest that, but I suspect not. 

I used to take a lot of care with growing lettuce seedlings, and transplanting them, but now all I do is put a stack of different seeds into a jar, and sprinkle a pinch of them around directly into the growbed. 

I suspect the clay balls are better than scoria when you direct seed. I think the seed (especially small seeds like lettuce) fall down until they stick to the side of the media once it's deep enough that the media is damp. 

I suspect that's just right as far ar growing goes. 

Perhaps with scoria, the seeds catch in the holes in the media before they get to the correct depth. 

Or it could just be luck, but I'm seeing much better germination rates in the clay ball media. 

But it's also a constant flood grow bed, so perhaps that's got something to do with it as well. 


120 Things in 20 years - Results, but no science to back it. Oh, and also PVC Aquaponics tomatoes.


Aquaponics - Cucumber sprouts

Every single one of the capsicum sprouts got munched by slugs.

Now I have cucumber sprouts that have worked realy well in the bean sprout sprouter.

These seem to have done particularly well in the sprouter, but that could just be because they are a large seed, and make a large sprout.


I'm calling using a bean sprout sprouter to raise seedlings for aquaponics, a total success.

This cucumber sprout is around 240mm in total length from tip of root to leaves.

That's a big sprout.

All grown from seed in the bean sprout sprouter, and all strong, healthy, and best of all totally organic.

Actually the real "best of all", is that it doesnt contain any dirt that needs washing off before planting in the system.

Also, it's length means the roots should reach nearly to the bottom of my grow beds.

Much more than they need to find all the water and nutrient they could desire.


And all that means they should have no problems growing.


120 Things in 20 years - struggling without a spell checker to post anything at all, but still managing to put some semi-science out there in the form of my Aquaponics cucumber sprouts.


Aquaponics - Mini seed raising grow house success

It's well over a month since I wrote a post on seed raising, where I tried my current method for the first time.

I think it's a success.

I planted fifteen cups with perhaps two or three basil seeds in each. From that I got around thirty sprouts with every cup having at least one successful sprout. I'm not sure what the normal germination rates are for basil, but that's good enough for me.

The main advantage is that they are planted directly in the posts they will spend their entire lives in, so they wont get disturbed with transplanting.


I've since removed two sprouts and planted the pots with lettuce, with each one planted about 10 days apart. (a new lettuce cup is in there now to the left of centre) This means that, since the basil sprouted, I've planted, sprouted, and moved out two cups with cos lettuce in the time the basil has taken for the basil to have grown enough to be ready to move.


Here's one coz lettuce I just moved.

There are three seedlings in it, and I'm pretty sure I put three seeds in, so my method seems to be working fine.

I'll probably take the smallest one out, but my experience with three or more spinach seedlings in the one cup says it should be fine. I repeat harvest spinach and lettuce, so the plants never get to full size, but if one get's too big, I'll just harvest the excess and just leave one per pot. Whole small coz leaves make great Caesar salad.

This is another cos lettuce cup I moved ten days ago or so.

The cos lettuce seedlings I grew without covering the seed at all. I just dropped them on the surface, and put the lid on the mini seed raising growhouse. The condensation rain was enough to keep them wet enough to grow roots long enough to touch the water. That's enough enoughs.


It's also interesting that it's the original water in the mini seed raising grow house, that is now around five weeks old with no signs of it going off or tuning green.

So here is my official seed raising guide...


------------------------------------------------------------------------------------------
120 Things in 20 years Seed raising guide 2011        Page 1 of 1  


Put a seed on top of a pot filled with scoria.
Put the pot into a mini seed raising growhouse with an inch deep of fish tank water in it.


                      this space intentionally left blank


------------------------------------------------------------------------------------------


You can print that out and make a calendar with it if you like.


120 things in 20 years. Not just empty space and success with mini seed raising grow houses for aquaponics, but so much more.

Aquaponics - Seed raising

I love seeing the first sign of a seed sprouting.

But I don't like how much space an empty pot of gravel takes up, so I came up with a better way.

I've talked before about how I've tried to make my space modular so I can shift plants to places where there is more space when they need it, but keep them packed closely together when they are small, and don't need the space.

My original plan was to use small black plastic pots from my garden store, but now I use plastic cups.

This was partly due to not being able to find a hole cutter that fit the black pots perfectly. The cups are tapered, so will cope with my lack of accuracy with the hole cutter.

They seem to work well, and cost 4 cents instead of 25 per pot.


My original plan was to bury an ice cream container into the main grow bed, and then I could sit the newly seeded pots into it where they would be watered by the flood and drain of the grow bed's cycle.

The problem is, where I would have fit 9 of the black pots, I can only fit 4 of the plastic cups. This means it would take up too much grow bed space to run the intended 18 pots.

The object was to have up to 18 pots with various stages of seed raising from just planted, to a few weeks old. These would be moved to wider spaced holes within the NFT tubes as required, but would take up little space in the meantime.

I own a small seed raising mini-growhouse, so I thought I'd give it a go.

I was hoping that the enclosed design would keep the seeds damp, and keep any pests away.


Sure enough, its a few days later and I see sprouts.

These are all basil, being raised for a new proposed basil section behind my strawberry towers.

Water drips from the roof, and has so far kept all the grow media (scoria in my case) damp. The water that drips from the mini-growhouse ceiling would be basically distilled water, and as such would have no nutrient, but I don't think seeds actually need nutrient for the first few days. I think they live off their stored energy in the seed.

There is around 2cm deep of water in the bottom, and that is probably also contributing to the moisture content as a result of wicking.

I filled the pots nearly to the top, added seeds, then added a layer of scoria. Then I gently watered them in with some water from the fish tank (gently, because it would be easy to wash the seeds away. (no doubt this deposited a small amount of nutrient onto the sroria as well)

My greatest concern was that the nutrient rich water from the fish tank would go rotten because the water was still, but it seems to smell fine after week one, and the seeds are starting to sprout.

I wonder if it's the constant "condensation rain" within the mini-growhouse keeping everything fresh.

Who knows, but it seems to be working.

It will be interesting to see what happens in the next two weeks or so when I it will be time to move them to their new homes. If they avoid growing mouldy, and the water stays fresh, I think I may have solved my seed raising requirements.

Aquaponics - Strawberry seeds

Strawberry plants from seeds!

I had no idea.

A few people I've spoken to about them, said that they haven't had much luck with germinating strawberry seeds, but there are some that have.

I plan on being in the "some that have group".

Strawberry seeds are roughly as small as you might imagine they would be. This isn't actually a strawberry seed pictured to the left with the toothpick, its a bit of dirt.

But it looks a lot like a strawberry seed.

By the time I realised I needed a photo of a strawberry seed, I didn't have any left, so I just substituted some seed shaped dirt.

Nobody will ever know.


I started out with some seed raising mix because of the reports I've read of other people struggling to get their seeds to germinate. I'm not sure that this is actually necessary, but it will mean I can rule out out poor soil if they fail.

I placed a seed in each pot, covered lightly with seed raising mix then pressed to contact.


Then I lightly watered them.


I'm not sure about the economics of using seeds as there were only eleven seeds in one of the packets.

I did actually email the company because I was a little disappointed, and they replied asking for my phone number, so perhaps that's not normal. I wont mention the brand just yet and see what happens. It could just be that the receptionist is going to ask me out on a date.

I'll wait and see.

The seeds cost around $7 a packet, and on the same day I bought nine little strawberry seedlings for $3.95, so unless my strawberries grow very rapidly up to the clouds revealing giants, special geese, and general adventure, I suspect I wont be buying any more.

From what I've been told by seed packets and humans, I should be waiting for some time between a day or two and eternity for these things to germinate.

So I guess there's nothing left to do but to watch this space.


I hate waiting.


.

Aquaponics - My first strawberry

One of the things most important to me in doing aquaponics, was to grow some strawberries. A lot of strawberries. I love them.

Some time ago I bought a selection of different varieties of strawberry to plant out to see which would work best in an aquaponics environment. Sadly only one seemed to thrive, and I have no idea which one it was.

Success! It's now fruiting, and in a couple of days I'll taste the fruits of my labour.

I'm now frantically searching to see if there is some way to clone this plant.

I know that at some stage in their growth cycle they send out runners, but there might be a way to divide up this plant to get a lot more going rather than doing all that waiting.


On a not so successful note, I planted out some seeds a few days ago, and there have been mixed results.

Pictured here are giant white radish.

For some crazy reason, many of them seem to have died.

They look like they over heated, but the weather was far too cool for that. They definitely didn't dry out. The only other thing I can think of was that perhaps the water and fish emulsion tea was too strong, and it burnt the leaves from direct contact.

I'll see if I can water them without getting them wet.

Aquaponics - Water testing

Its extremely important to make sure your water quality is within a desirable range. Aquaponics is remarkably stable and robust, but, for the first few weeks of setting up a new system it can require a little extra care. The best way to avoid any problems is to test your water every day until your system is mature and in balance or "cycled". (pictured here taking 30 days or so)


An aquaponics system is said to be cycled when it can process approximately 1 ppm of ammonia into nitrites and then process those nitrites into nitrates within 24 hours.

A decent freshwater test kit will enable you to get accurate test results for pH, ammonia, nitrites, and nitrates. It will set you back around 50 Australian dollars. They are widely available online or any good aquarium shop should sell them.

If you try aquaponics without water testing you will lose fish unless you are very lucky.

Add ammonia until you see a reading of 2ppm, then wait until your tests show ammonia is 0. Then add more and continue until your system can process 1ppm of ammonia and nitrites in 24 hours. Once you see readings of 0 ammonia and 0 nitrites you are cycled and can add fish.

Plants can be added on the day you first build your system but there wont be much for them to live on for a few days. My house water supply is rainwater and has some nitrates in it from normal environmental nutrient. Even normal tap water will have some nitrates in it so there will actually be something for small seedlings to live on.

Be careful to wash the soil from any store bought seedlings you transplant as they may have any number of additives that may be toxic to an aquaponics system. Growing directly in the grow beds from seeds is safest (and often quicker!)

Conduct water testing every day until you are cycled and then test every week or so or if ever anything strange occurs. Plants yellowing or dying can be a sign of something being wrong with your water chemistry and you might need to intervene in the early stages of your aquaponics system setup. More on correcting water problems later.

Always keep a record of your tests so that you can see emerging trends before they become an issue.

Popular Posts